Friday, March 22, 2013

Kim Robertson Stackum High...

Hello Crafty friends all over the world,
 I'd like to introduce myself to you properly.
 My name is Kim Robertson and I am in the UK.
 It is my pleasure to bring you 3 projects this month and I hope you enjoy them as much as I did making them, (even if my fingers seem to have puff paint stuck everywhere )
The first is a 6x6 box and I used a very sweet Image from one of the stackums section on the fabulous Memory Maze Design shop which I decoupaged onto the lid of the box for dimension and interest. I also used chipboard elements that are so delicate but sturdy and so easy to add colour to.
I Then added embossing to keep the colour True.
 The vintage corners that are so very pretty look great with added puff paint and blasted with the heat gun to expand them, I rubbed a little gold wax onto the corner to make it shine and colour my project a little.
Here it is...
I added some little Easter treats as we are nearly at that time of year again.. they may have been 5 in the beginning haha...close ups below.

I hope you like this image, I loved the beautiful shades of pink as soon as I saw them and really enjoyed taking time cutting out the stackums (In the UK this is called Decoupage coming originally from a French term) wow history too hey...
The products used from Memory maze on this project were.

  Product ID : C0155
 Product ID : C0139

Animal Stackums

.........................................................................................................

Next I have another cute card for you from the stackum selections , this time in a richer darker colourway , I am very much enjoying my time on this Design Team with the fabulous girls all designing with Memory Maze design products.

 Ahhh now everyone say it... cute hey....

 A close up on the pretty little bear, I added sparkle to each flower too.

 I really enjoy making Roses and these came out very pretty and although the picture hasn't picked it up there is some very subtle sparkle all over the petals.

Lastly I again added puff paint and heat set, adding gold wax
and bright blue gel ink all over to tone the chippie to the card.
You can see the Stackum layers just a little on the right hand side to make the image stand proud of the card.

The Memory Maze products this time were

Product ID : E0002
 
Product ID : C0004

Animal Stackums
 .............................................................................................................


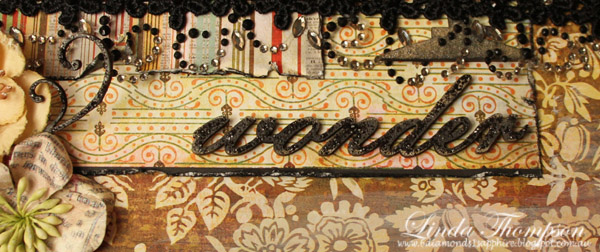
My Last Card for this month of March and the start of my Term with Memory Maze is a rather elegant easel card using a very special stackum shoe design and a sentiment included on the sheet.


 I added a Beautiful chippie word to the side here and used a pearl embossing powder which looked so gorgeous and much better to the naked eye.

 A close up of all the tone on tone details with the embossing and die-cutting elements complementing the fabulous MMD chippies and Stackums.
Lastly the pretty Stackum shoe with it's diamond sparkle peep toe. I really hope
you enjoyed my first time out this month and I look forward to bringing you lots of surprises next month and maybe even a little altered goodies. 
Please feel free to leave me a comment as I do appreciate every single one of them
Take care and have a fabulous chocolaty Easter.

All for now
Kim 
xxxxx

The products this time were

Product ID : G0037

Product Id  DS0113


........................................................................................................

Wednesday, March 20, 2013

Victoria Freze - March DT reveal

Hi everyone!

It's Victoria from Ukraine and my first projects for Memory Maze. If you don't know me yet you probably don't know either how much do I love chipboard. It's so versatile and can be used almost in every project you create. I like to create layouts and cards, so for today I have them both here to share with you.

'You & Me'


I created this layout for my friends about their wedding day. It has no obvious title because I wanted to make this layout bright, clean and to focus on the picture. To make it more exquisite I used large swirl and created a cluster of it and flowers.


First I covered chipboard with gesso, let it dry and than covered with pink and blue distress inks. On every project shown in this post I used different techniques. So, if you like to create a light tone on the chipboard   as it is in this case, you have to cover it with gesso first and than use inks or mists.

Memory Maze products used:

Swirl,  Product ID : 3cc6766617a9622

Other products used: Teresa Collins paper and die cuts, different flowers, dies, washi tape, gesso, distress inks, glimmer glaze and pearls. 

................................................................

Romantique - card


In general this card is nameless and can be used on different occasions whether it is birthday, wedding or any other case. It is more feminine and a little bit shabby, although it's not really my usual style, but for me it is so romantic. 


For this card I covered chipboard with glimmer mist at once. Now you can see the difference between that one which was covered with gesso first. In this case the color is darker and more intense.

Memory Maze products used: 

Vintage Corners 3, Product ID : S0534 

Other products used: Kaisercraft papers and flowers, ribbon, glimmer mist. 
................................................................

Just For You - card


I love both soft and bright colors, but these make me more happy. A birthday card for my friend. 


This chipboard is covered with acrylic paint and it looks bright and thorough. 

Memory Maze products used 

Just for you, Product ID : C0155

Other products used: Galeria Papieru papers, Petaloo flowers, washi tape, twine, punch, dies, acrylic paint.

hope you have a wonderful week.
Happy crafting! 


Monday, March 18, 2013

Memory Maze DT work

Hello Memory Maze Fans Linda is back today to share some Chippy goodness with you.

'Sisters'


I love these Vintage boards they come in several sizes and include a stand, This one is about the size of an A4 piece of paper. First I painted the edges, top swirls and stand in gesso, then I added a piece of paper and inked the edges and top swirls in a couple of different tones, added a few stamps to the edges of the papers and the center piece at the top of the stand.


Using a MMC hot air balloon I didn't quite have the colour I wanted to I sprayed it with glimmer mist and while still wet I sprayed it with a home made white paint spray to soften and blend the colour, I then added a touch of ink to get the perfect colour.


I took a Wrought Iron swirl and cut it into 2 and applied the same technique as above but this time I started with  tones of distress ink, I didn't cover the entire piece in ink just little bits of each colour ink but once I sprayed it with the white paint they blended together and lighten giving me the perfect colour.


The second piece of the Wrought Iron Swirl


I used the same technique as before on these MMC cogs this time I used a chalk ink and a mix'd Media ink, once again I didn't cover the entire piece in ink and I sprayed them with just water this time to get them to blend together.


More cogs at the top of the layout.


Sisters MMC was embossed, first I applied gesso in a watered down spray, once dry I added a little bit of pink embossing powder to small parts of the word and then coated the whole thing in white mix'd media embossing powder and heated, I applied a second coat to give a think consistent layer.


MMC street lamp has been treated the same as the word this time using a blue and brown embossing powder.

Memory Maze Products Used

Street Lamp - C0144
Vintage Board - Q0005
Cogs set - L0048
Wrought Iron 30 - S0444
Hot air Balloon - 

..................................................

"Perfect Wonder"


A gorgeous photo of a gorgeous girl, I'm a little bias.. even with her dribble drenched shirt and messy hair.


Memory Maze Candle holder was first painted black with distress stains then I went over it in tarnished brass distress stain.


A cute little Memory Maze card size bird cage also treated the same as the candle holder but this time i added a little more black over the top.


Perfect word was painted with black distress stain and then black stickles added


Wonder word also treated the same as the perfect word


Wrought Iron swirl was cut into 3 pieces and treated the same at the words, I tucked 2 in here and the 3rd was tucked in at the bass of the candle holder.

Wrought Iron 14

Wrought iron swirl, I cut the large end of and then the smaller end in half.


Memory Maze Products Used

Wrought Iron 14 - S0435
Candle Holder - S0588
Bird cage - C0170
Perfect word - G0196
Wonder word - G0212

.............................................

"Sweet Treasure"


I was inspired to create this layout by a couple of our other wonderful Green Tara DT members, I love the result with lots of Green Tara goodies and some very messy hands. 


Memory Maze 12" frame has had texture paste added in some areas and the rest was covered in gesso then hand made paint sprays used in 3 colours.


Lots of Green Tara Lace, Cobweb and ribbon was mod podged and texture pasted into the background, then gesso added to the edges & homemade paint spray to add a little colour back. topped of with roses and buds.


Lots more Green Tara flowers, each has had the edges dabbed with gesso


Treasure chipboard word from Memory Maze has been inked then slightly painted with silver ink


Another chipboard piece from Memory Maze treated the same way as the treasure word


Jute Ribbon bow from Green Tara in white with touches of black and blue ink.


Memory Maze Products Used

Street lamp - L0082 
12' Wrought Iron Frame - Z0012
Treasure word - 

Thanks for stopping by 


Saturday, March 16, 2013

Sharm Nidyanandan - March DT Reveal


Hello Crafty Friends! I'm Sharm from Malaysia. This is my first post for Memory Maze & I'm excited! Firstly, I must say I'm extremely thrilled to be creating projects for Memory Maze! It's a fantastic opportunity to be able to work on and share with you of the endless possibilities you can use their chippies for..I've used some of their chippies on the two cards I've got to share with you today..hope they inspire you! ;)

It's A Girl! - Card


Close-up

This card was put together using the lovely Heartfelt Creations & Graphic45 patterned paper. The sentiment chippie by Memory Maze was inked up using Donna Salazar Mix'd media inx in Jasmine. Leave it to dry before adhering to the card and further embellish with flowers and such.

Materials Used:


It's a Girl
Product ID : C0003
Memory Maze Chippie: It's A Girl 

Others: Heartfelt Creations & Graphic45 patterned papers, Donna Salazar Mix'd Media Inx, Pearls, Prima Flowers & Bling 

……………………….........................................................................

My next card for all you Mixed Media enthusiasts out there :) 

Bird Cage Wedding Congratulatory Card


Close-up

To create this card, simply die cut cardstock to form a frame. Alternatively, you can opt for the amazing laser cut chippie frames by Memory Maze which you can find HERE!

Adhere the corner chippie to form a handle for the bird cage and adhere the bird cage chippie on top of it. Using various spray mists, mist away to your heart's content :)

Finally, further embellish with blings, or flowers..your choice ;) and stamp along the corners with a flourish stamp using white 


Materials Used:
Memory Maze Chippie:  Mini Bird CageBoarder Hook


Boarder Hook 1
Product ID : S0147


Mini Bird Cage
Product ID : C0170


Other Materials: Heartfelt Creations Die, Prima flowers, Tattered Angels & Heidi Swapp Glimmer Mists, Hero Arts Stamp

Hope you find some inspiration in the projects I've shared today! Happy Scrapping and have a wonderful weekend!!

Sharm


Friday, March 15, 2013

Hilde Aaslund - March DT reveal


Hi!
It's Hilde from Norway here and I'm so happy to finally be here with you!
 
My favourite scrap supplies are those which are multi purposal, which can be used for both cards, layouts and altered items. And a lot of chipboards are suitable for different kinds of projects - that's why I love them so much!
 
In today's post I'm going to focus on small card sized chipboard phrases and show a few ways to use them.
 
Best Wishes Cards
 
The most obvious way to use card sized phrases is on... cards!
These two are super easy to make, all you really need is a few pieces of scrap paper, a chipboard phrase and a second small embellishment. Just by changing the color cheme, you easily make both masculine and feminin cards.


I often paint my chipboards with acrylic paint, especially when it comes to phrases and words as they are easier to read, in my opinion,  when they have an even color. For a more glossy finish I coat the words with a glossy varnish.


Memory Maze product used:
 
 Product ID C0007
 
Other supplies: Studio Calicio March Card Kit. Paint: Parma.
 
..........................................
 
 
At the Photo Booth
 
I was looking for a printer manual the other day when I found this fun photos of my oldest son among the papers. I think they were taken back in 2000 when he was just a toddler. Isn't he cute?
By framing a Merry Christmas phrase, and placing it far from the photos, I let the phrase tell the secondary story: that this photos were taken about Christmas time.
 
 
Click on photo for a bigger view
 
 
The Chipboard phrase is painted with a burgundy acrylic paint and then finished with a glossy varnish.


Memory Maze product used:
 
Product IDC0075
 
Other supplies: Patterned papers: Studio Calicio. Button, twine & raindrops: unknown. Paint: Parma  
 
 
Sick
 
We had winter break in February and my youngest son was sick with the flue the entire week. School started again, and then the oldest son got the bug. He's the one in the photo below.
 
 
Click on photo for a bigger view
 
On this layout I have chosen to repeat the phrase Get Well to make my wish more powerful. I used the super cute boarder hook chipboard as a base for my "sign" and used two swirl corners to frame the photo.
 
 
All the chipboards are painted dark brown with acrylic paint to get a uniform look, and as the rest of my chipboards they have a glossy finish. To balance the design in this layout, I have used the same paint over a mask here and there.
 
Memory Maze products used:
 
Product ID C0013


Product ID S0147

 
Product ID S0147
 
Other supplies: Studio Calicio March Card Kit. Paint: Parma.
 
 
...............................
 
I hope to have given you some ideas on how to use similar products in different ways and in different kind of projects. Don't hesitate to ask if any questions.
 
Happy scrapping!
Hilde