Thursday, August 15, 2013

Kim's last reveal and August farewell.

Hey all. 
 
I wanted before showing the pictures to say a last goodbye to you all and say I have enjoyed being here immensely but you are a bit far away haha. 

I have had a blast and want to thank the team for travelling this journey with me and to thank Linda for her support and encouragement and lastly Sally, Memory Maze owner and say a huge thanks for always being there in the back ground and commenting even on things that aren't MM. Huge thanks for the opportunity.

Now I have that out of the way I have just one last card to show but lots of pics, it has several techniques in it and three beautiful pieces of gorgeous chippie too. 

So here it is I embossed the background and added inks and gleam wax colours to it.
 You can see I used turquoise and purple on then to look as amazing as they are.

 Here is the Best wishes chippie, it has been fabulous to work with it.
 Here is the feathers chippie with gleams on it but how intricate too.


 This is the chippie I used but their are many more in the shop to see.
I could not find this feather but their are many in the shop .

I hope everyone has liked this project which I will put onto my blog as well.
I cant believe that 6 months have gone by so soon wow very quickly it flew by.

Take care and lots of crafty Hugs.

Bye to you all 

crafty hugs

Kim 

xxxxxxxxxxx


Monday, August 12, 2013

Erin Reed - August DT Reveal

It is always so bittersweet to be at the end of a design team term, but as always I have had a blast working with Memory Maze and I hope that I have inspired some people to get out there and make some paper crafts and to get their creative juices flowing.

Please enjoy my last post for Memory Maze it truly has been a wonderful company to work with and be apart of, plus their products are AMAZING!!!

.....................................................................................................................................

So Blessed
Acrylic Trifold

Over a year ago I went to a conference and took a class on how to use acrylic.  We made the three background pieces in that class.  Since then they have been sitting in the bag I brought them home in since the class did not allot enough time to finish the project, but it was still a fun class.  As I was cleaning up and packing my scrap area getting ready to move I came across the bag with my unfinished project laying inside.  I took the parts (paper, flowers, and acrylic) and mixed them in with some raw chipboard to complete the look.  Never be afraid to deviate from the products and look of a class project, make it your own!!

I did not place any pictures into the trifold yet, as I wanted to place more current pictures of my kids dressed up nicely and we are getting professional pictures done of my little ones when my daughter turns 1 at the end of August.

 Wrought Iron 39
 Boarder Hook 2
Here I cut up 2 of the chippie swirls and placed them behind the flower on the top.  I then used two underscore chippies and placed them on either side of the mat and stamped title.


Vintage Corners

Here I used the vintage corner chippie at the top and a swirl with a flower on top at the bottom.

Boarder Hook 2 
 Wrought Iron 39

On the last page I used the same swirl chippie as the first page but whole and the same underscore between the two mats.

Memory Maze Products
Vintage Corner - C0139
Boarder 40 - E0011
Boarder Hook 2 - S0148
Wrought Iron 39 - S-0430
  ...........................................................................................................................................

Pretty Cards

Every now and then I get in a bind for a wedding shower card, wedding card, baby card, etc.  I want to give something pretty and dainty.  So I created 3 simple cards that have a feel of shabby chic to give out for any of these occasions when they arise in the future.  I used the same papers and embellishments, just different designs to give them a one of a kind feel.


For each of these cards I used a small chippie word that I left raw.  Don't always feel that you have to dress up, paint, or alter your chippie if it looks good on the project just the way it is. For the word "wishes" I had cut the word "best" off previously and used in another project.

Forever
Best Wishes

kisses

Memory Maze Products
  forever - G0080 
Best Wishes - C0015
 kisses - G0192 

 ..............................................................................................................................

Vintage Gift Box

Since we are moving we are saying goodbye to our nanny that we have had for the past year to help me with the kids during my husbands deployment and moving days.  I want to give her a little thank you for all her help and hard work she has given us this past year, so I made this little gift box for her.


12 x 12 flourish corner set 8sold 3\'s
I used a plain black gift box (about 1 inch deep and 3 x 3 inches square). I then decorated the top of the box for a bit of fun.  I used the same ink on the chippie (pink distress ink) as I did to ink the edges of the papers on the box.  I used the smallest chippie from the 12x12 swirl set.


Memory Maze Products
12x12 flourish corner set - Z0024

Enjoy!!


Thursday, August 8, 2013

Donna O'leary - Design Team Spot

Hello and Welcome to my wee slice of the world, New Zealand.  I live in a stunning country with amazing places to go and explore and  such friendly people.  Being such a small wee country it is hard to find embellishments  for  scrapbooking projects and cards.  One of the awesome things that Memory Maze does is if you think you have a good idea is to share it.  I suggested some New Zealand theme chip board would be awesome.  Today I am showing you just a few bits that has been sent to me by Sally ( shes awesome).


...................................................................................................................................................................WORD ART

I love the look of word art and have always wanted to give it a go.  So I got a small canvas (A5, I think).  I did not colour the canvas, I wanted the words and chippie to stand out.


I love how it turned out and will be making more very soon.  Here is a close up of the AWESOME CHIPBOARD 


I have covered them in a thick moulding gel and let it set and then randomly covered them with foil paper from WOW.  I have done that technique with all the chipboard on this project.  


I added distress ink on some to give a bit more detail.


...................................................................................................................................................................

NEW ZEALAND

I REALLY love how my Sheep and lambs have turned out,  in my stash of embossing powders I found some white puff powder and it really worked a treat!


A close up...


Don't they look real!  I think Chip board is one of the best products to have in your stash,  you can do so many creative things with it.   I also added one of the New Zealand titles to my card

A really good trick to do when you are using really fine detailed piece is to add the glue to your non stick craft mat and then dip the back into the glue lightly.  That way you are not trying to get tiny bits on the back and get it everywhere.  

...................................................................................................................................................................

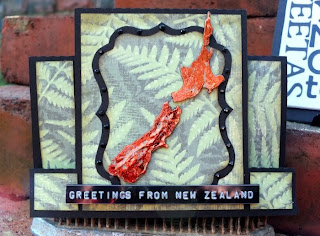
HELLO FROM NEW ZEALAND

My last card for today is Hello from New Zealand.  I have made a step card and added my Cut out of New Zealand to the front.  Before I added it to the front I put a big blob of molding gel on my craft mat and dipped the right side up into it.  Creating creases ( in my case I was hoping them to look a little mountains) 


 A close up. 

Well I hope you have enjoyed my wee share of New Zealand,  Next time round I have a mini album to share with you all using some more New Zealand theme Chipboard.  ( bungee jumping, tramping and a few other cool bits)

Thanks for stopping by, take care and happy scrappin.
Donna


Tuesday, August 6, 2013

Amanda Lawrence - DT Projects

I've had a lovely time playing with all the wonderful Memory Maze chipboard pieces this month. I have three new layouts to share with you all today. 

Perfect Hat


My daughter loves to go through the bin ... gross I know. We've given up on a regular bin and instead have a small bench top one out of reach. Little bin = little lid and the perfect size for little heads! 


I used frames from the scalloped overlays pack which I inked in yellow. This piece was going to end up under my photo so I chopped it off to use here instead. They looked a little plain just in the yellow so I decided to stitch them on in a contrast colour to break it up. 


I used the 'perfect' word from the banner words pack as part of my title. I simply inked it and then highlighted the writing with my silver Sharpie. The title is layered over the other piece of scalloped overlay. 


I also used the largest size of overlay to go under the main area of my photo. The pack comes with several sizes all nested inside one another. It was the perfect size to layer over a paper doiley.

Memory Maze products:

Other products used:
Echo Park papers, bazzil cardstock, ink, watercolour paints, thread, pen, D-lish Scraps flowers, lurex ribbon, paper doiley, AC thickers.

....................................................................................................

Bus Trip Selfies


Being a Work from home Mum and running your own business has it's perks. Being my own boss still allows me to have the flexibility to be there for my kids when I need to. I was lucky enough to be able to head along on a recent excursion with the class. We hit traffic on the way home on the bus so amused ourselves by taking some selfies. 


I'm obsessed with stars! I love all the different types of chipboard stars that Memory Maze has to offer. They are the perfect accent for my boy pages. This smaller one is from the multipack and I have simply covered it in some patterned paper.


The other stars are from the 12x12 stars set. This sheet is such great value and you get sooo many pieces. A big set of nested stars fill the centre and all the other space on the sheet is filled with various size stars. I finished off my cluster with a few of the people from the micro sheet. Covering them in paper was a little tedious but well worth the effort. 

Memory Maze products:

Other products used:
Carta Bella papers, Teresa Collins papers, Echo Park papers, cardstock, Jillibean Soup alpha stickers, Studio Calico star stickers, MoTEX tape writer, A Piece of Cake Designs Cherry Flair, ink, pen, tiny attacher.

....................................................................................................

Sleep


My daughter always sits on the couch while I vacuum. She doesn't hate the vacuum but I wouldn't say she's a fan of it either. I went down the hall to do the bedrooms and when I came back I found her fast asleep. She's certainly not one to just nod off so this was a very rare moment.  


I used the flower swirl piece for this page which I inked in pastel green. I they added some pen to the petals and some adhesive pearls to the centres of the flowers. 


There was a part of the design that would be completely covered by the flowers so I cut it off and rearranged it to poke out the other side of the cluster.


For the main area I used one of the nested inverted corner squares which I covered in some patterned paper. I split the frame apart under the photo area which gives the illusion of it actually being a rectangle.

Memory Maze products:

Other products used:
Authentique papers, cardstock, Scrappers Garden flowers and butterflies, ink, pen, paper doiley, D-lish Scraps resin flowers and leaves.

....................................................................................................

Thanks for stopping by the blog, I'll be back again later in August to share some more layouts with you all. 

Amanda