Showing posts with label Project by Donna O'leary. Show all posts

Friday, January 31, 2014

Celebrating Firsts


Hello and welcome all.  If you have not read yesterdays post click here,  we have added to the Design Team family so please pop by and welcome them.

* * * * * * * * * *

Amber-Leigh's First Fish
  Sally the lady behind the scene who creates all these fantastic designs sent me a 12 by 12 frame a very long time ago.  I have been waiting to use it and today is the day.

My partner in crime is a fly fisher and over the past year he has been taken Amber-Leigh out on a few fishing adventures.  They spend the whole day out and always come back with a trout or two.  This day was super exciting as Amber-Leigh caught her first fish.  She was so proud.


For this project I used Gelato's, Pitt Pens and clear embossing powders. It really was a learning curve as I am still exploring gelato's and loving it.


I covered the entire frame with a very light layer of gesso first so the gelatos would not soak into the chipboard.  Then using different colours and my finger I started to add colour to the chipboard.  on the fishing man I also used a Pitt pen to give some detail.


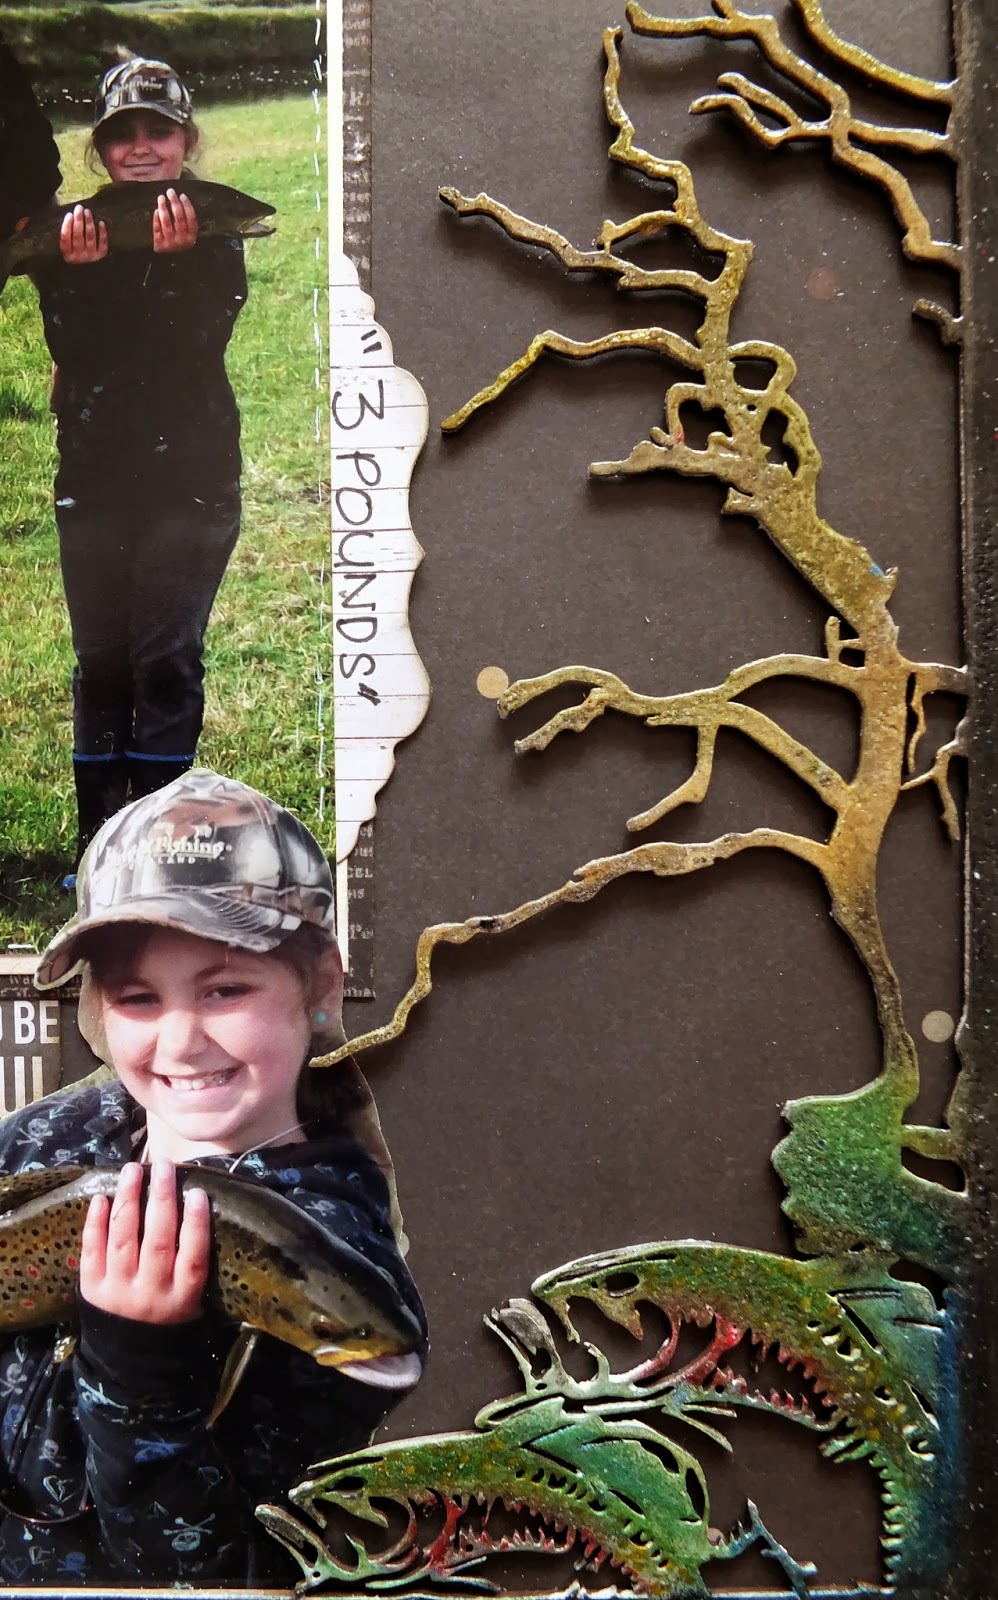
I used a mixture of browns for the tree


Just thought I would add a close up of my proud fishing team :-)


There is so much you can do with this frame.  For the fish I used a number of colours and then used a pitt pen to add the spots of yellow.


To make the frame pop a bit more I added the blue and to seal the whole frame i embossed it with a super fine clear embossing powder from Wow Embossing.

Memory Maze product used:
Fisherman overlay 12 x 12  sold individually

* * * * * * * * * *

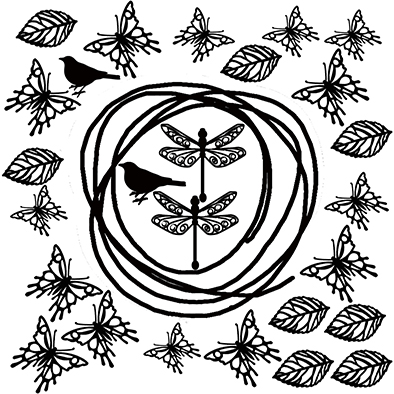
One of my favourite pass times is to play in my art journal and explore new ideas.  I was playing with sprays and masks for the background of this page and it was so pretty I had to keep adding.


I have used a number of smaller pieces of memory maze chipboard to finish off this page.


I used an embossing pen to emboss the word love with white embossing powder,  I love how you can used the outlines of the words to colour,  I must admit that I need a new pen as the fine tip is a bit rounded now.  After I embossed I added blues and purples and blended with my finger.


I had some left over butterflies from another project, theses have a thin layer of gesso and then painted with distress paint.  I used a font stamp to add texture.


These words were embossed in white and then I added a small amount of blue pitt pen and rubbed around the edges.


I close up of the blue


Memory maze Chipboard Products I used:

Flat banner words celebrate 100 x 150sold 3\'s

Forever wordsheet sold in 3\'s

Secrets word sheet sold 3\'s

Lindas scribble with butterflies dragonflies and birds sold indi

* * * * * * * * * *

Thanks for popping by, I hope you have enjoyed my post today and look forward to seeing you all again soon.  Till then,  Happy scrappin xox Donna :-)


.


Wednesday, January 15, 2014

Memory Maze Chipboard, So many different ways to use Chipboard.

Hello and welcome back,  so glad you could pop on over and take a look. 
 Today I have three projects to share with you.  So far 2014 has been very productive. 
 Might be that fact that the weather has been horrid! 
 My kids are going a bit stir crazy inside all day so we have been getting inky :-)

This months theme is celebration and there has been a lot of that happening around here. 
 Christmas,  New Years,  Birthdays and still more birthday to come. 
 My wee Alex is growing up so fast, last week he turned 6!  Where has the years gone. 
 I have created a double page layout because I loved all the photos of Alex blowing his candles out and did not know which one to use, so I used them all.

HAPPY BIRTHDAY

 For the Happy birthday I have painted it with Distress paint,  
you could use any paint but I love my distress paint.


The pinked stars I spent a bit of time gluing down and covering it with paper then cutting
round with my craft knife.  I think it was well worth the time,  you could paint them 
but I really liked the texture of the paper.


I used one of the smalled stars as a frame for a photo. 


To finish off the stars I got a white pen and added faux stitches


Memory Maze Products used for this Project:

200 x 200 Pinked Star2

Happy Birthday

* * * * * * * * * *

HOW DOES YOUR GARDEN GROW

 I have had this wee prima doll sitting on my bench for a while,  its been stamped off 
heaps as the girls love colouring her in. I have been meaning to make a project 
with her for a while.  I was going threw my Memory Maze stash :-) 
and thought about making a canvas.  I had no idea what i was doing but pulled out the bricks,
wheel barrows and clouds, so something must of been brewing :-) 


Its amazing how things just happen,
  I started by pulling some of the bricks out, and then I cut it up. 
I then had to back track a bit and make a background, I must of decided
 to make a bit of a garden as all these bits kept being popped on my table :-) 
 like my flowers.


For the water can I used white distress paint to give it a light background to colour,
  you can use gesso too do it as well.  I used distress paint as it does not take as long to dry.
  I really love gesso as you can add texture before you add your colour.
  After the paint dried I used geletos and markers to colour.


I distress painted this super cute mushroom, then coloured with geletos and
 white marker. Once it was dried I  added smooch to bling it up.


Now this wheel barrow was so much fun to do,  distress it :-) if you follow me you will
 know that I love to distress.  I started by applying a thin layer of light distress paint and then let dry.
  I then got distress inks out and added different colours,  splattered water on top.  YUMMO!


Now these are my favourite today,  I was playing around with my melting pot and some
 thick white WOW embossing powder and had this idea (Its not a new idea, as I am sure many people have done it before) of dipping the clouds into the melted embossing powder. I thought I would get a smooth effect but to my delight I got this rippled effect which is perfect for the clouds. 
 I later discovered if you use normal embossing powder you will get a smooth finish.


For the brick work I painted it with distress paints and then flicked with water, 
 simple but effective way to getting a worn look.


For my last idea  I embellished the wheel barrow with lots of pretty blooms .
 Finally I had a pretty place for my prima doll to me on. 
 Hope you like, I know the girls have been fighting over who is going to have this one.


Memory Maze Products used for this Project:


 Wheel barrow and watering can  100 x 190 sold in 3\'s


 Brick Wall

Clouds

lge mushroom

* * * * * * * * * *

ANGEL

I have one more project to share with you tonight,  the other day I was playing round with a 
altered book,  I found the  Memory Maze Angel Chipboard perfect to finish it off. 


I have embossed it with a WOW embossing glitter, love the stuff and just perfect for covering my chippie


Memory Maze Products used for this Project:
Angel - Sweetness  min buy 3

* * * * * * * * * *

Well I hope you have enjoyed my share today.  
Did you count how many ways I have used Memory maze Chipboard today?  lets see.
PAINT IT
COVER IT
FRAME IT
OUTLINE IT
CUT IT (ALTER)
COLOUR IT
GESSO IT
BLING IT
DISTRESS IT
EMBOSS IT
EMBELLISH IT
GLITTER IT 
SO MANY WAYS SO GET IT AND  PLAY

happy Scrappin everyone xox Donna


.

Tuesday, December 31, 2013

Pocket Project Layouts and Something a Little bit Sweet - Donna O'leary

Hello all, you might want to go pop the jug on and make a cuppa before you continue reading today,  I'm very sorry but this post is photo heavy which I am sure you will not mind.  I hope you have all had a wonderful Christmas and have been spoiled :-)

Today I am sharing two projects with you all.  I have had lots of fun making these and its great to get back in the craft room.  Right time to pop your feet up with you cuppa and enjoy :-)


. . . . . . . . . . . . . . . . . . . .

My Sweet Ruby


I started off making this project with the new Bloom paper range from Prima,  I cut the flowers out of a second page so I could have extra.


For my center piece I have used Memory Maze Vintage frame and embossed the entire frame with WOW bright white embossing powder,


I also found some sweet Memory Maze Butterfly Chippies which I embossed with a number of colourful glitter embossing powders, made them 3D and added some yummy Flourish with a Bling Pearls to the center of them


Here you can see some of the extra flowers I stamped and cut out from Kaiser craft poppy stamps,  I have coloured them in with H20 paints. In this photo you can also see the Memory Maze Corner Swirl which I have embossed in a white glitter and then cut to add more dimension to my layout.


Don't the butterfly's look yummy.  You can see the leaves that I cut and stamped here to


oh look at all that flourish with a bling pearls, I took this photo to show you all the layers, and the 3D effect of the butterfly's.  I love how this layout has turned out and will need to get a frame to pop up on the wall.

Memory Maze Chipboard used:

Vintage Frame

Vintage Frame, Code: X0006


Corner Swirl
Corner Swirl, Code: LOO87


Butterfly's to be loaded soon.


. . . . . . . . . . . . . . . . . . . . 

Christmas pocket page layouts

I am new to pocket pages and are finding my way around them,   I love the idea behind them to share all the photos I take threw out the year.  As you could imagine I take a lot of photos and for many years they just sit in big piles.  So my mission this past year has been to scrap them.  Its a completely different style to what I am used to but I am sure I will find my feet.  Memory Maze chipboard is perfect for this type of scrapbooking as they are not to big to add them to your page.  I have included the whole page and then took a photo of the close up to show you how I have used them.

Christmas 2013


For the first page I have embossed Christmas Joy Noel Memory Maze Chipboard.  This took a while as I used four different embossing powders from Wow Embossing Powders to colour it.


The little Christmas tree has been embossed in a green and then I glued some small sparkles to it and added some twine. 


These wee Christmas Presents are from  Christmas tree with presents and I have removed the presents and embossed and used a permanent marker for the detail.


Second Page


These are such cute little Reindeer, again I have embossed them in two different colours.  You can do lots with chipboard to give them detail,  I love embossing powders as it gives them stunning colour and texture.  Another way you could colour them is with paint, ink, and then apply a thin layer of glossy ascents to give it some shine


Page Three


Well this bell was trick and thinking about it afterwards it would of been better to paint,  But who can resist a good challenge.  I a have added enamel dots for detail. 


Page Four


I have embossed 3 Memory Maze Chipboard words with a bright red glitter embossing powder,  The Always is actually a word that comes with butterfly's on it and did not suit the Christmas theme, so i used a craft knife and cut them off.


Well I hope you enjoyed my share today and I have inspired you to get your crafty products out and have some fun.  Happy Scrappin every one xox Donna

Memory Maze Chipboard used:

Christmas Tree 1 Pkt 10

Christmas Tree 1, Code :COO96


Christmas joy noel   224 x 32mm min buy 3

Christmas joy noel, code: Christmas jo


Christmas Tree with Presents

Christmas Tree with Presents. Code: SO250

Always butterflies, Code :GO242


Family

Family, Code: GO183

Together
Together, Code: GOOO2


XMAS BELL SNIP AWAY BORDER 300 X 95

XMAS BELL SNIP AWAY BORDER


Reindeer 40 x 87 mm  pack of 10
Reindeer, Code : Reindeer


. . . . . . . . . . . . . . . . . . . . . . . . .