Showing posts with label mixed media. Show all posts

Sunday, February 17, 2019

Mixed Media backgrounds with Sarah

Hello crafty friends, Sarah here with some mixed media backgrounds I have been working on this weekend. These are great for art journal pages, to use for cards or in your scrapbooking.
Using a range of stencils and stamps from Memory Maze, I firstly brayered on acrylic paint to create the first layer. I then used stencils and stamps with coloured ink and paint to add further layers. Here are a small selction of my favorite stamps for this kind of project. I love the flexibility of rubber stamps - being able to bend and move them to stamp on the page. The full range of stamps can be found here.
For this background I used some bubble wrap and applied some white embossing powder to make it pop on the darker background. The mini stencils offered by Memory Maze are perfect for this - they are 4x4 inches or 100X100mm in size and are great to easily manouevre around a wet background.
Here are some of my favorite stencils (I love them all, but these are very versatile for creating backgrounds or for mixed media projects).
I like to work on many pieces at the one time so I dont have to get my paints and inks out at various times. Here is another background using some Memory Maze stamps and stencil. I have also used other stamps from my stash for these backgrounds, including Paper Artsy and Aall and Create. Paint used here is from Dina Wakley. div class="separator" style="clear: both; text-align: center;">
I hope you enjoyed this project. Stay tuned for some layout ideas coming up using these backgrounds in my memory keeping! Until next time, dont forget if you are interested in any of the Memory Maze products, be sure to contact your local craft store or Memory Maze for your local stockist where we can place our local sales reps in contact with them. The range of products available from Memory Maze are available online here.

Saturday, September 8, 2018

'Magical' by Sarah Rosse

Hello crafty friends, I have a bright and colourful layout for you today using one of the 12 x 12 inch dream catcher sets by Memory Maze.
This layout is being taught as a class at Scrap 2 Relax this afternoon so I wont go in to too much detail. The background was created using acrylic paints and a variety of Memory Maze stencils. Once the background was complete, this was added to a piece of white cardstock to really make the colour pop.
The 'Indian feather hearts' Mythical dream catcher was used for this layout. Firstly covered with gesso and then black acrylic paint. Prima wax was applied to the top of it to give the end result. I just love it!
The two feathers were gold embossed as well as the title word 'Magical' embossed with white embossing powder. I used a photo of my son for this layout - the effect that the portrait mode had for this shot kind of makes it look magical.
If you are interested in any of the Memory Maze products, be sure to contact your local craft store or Memory Maze for your local stockist where we can place our local sales reps in contact with them.

Wednesday, August 22, 2018

Canvas Love with Sarah

Hello crafty friends, Sarah with you today with another one of my mixed media canvas. This time it is a 12 inch round canvas - probably one of my favorite shaped canvas to paint.
Similarly to one of my previous canvas posts, I used the same approach and applied paint using an old credit card. Layering the paint with various toold give various textured and effects on the canvas. I used Dylusions paints for this project.

I then used a number of stencils to apply paint across the canvas. Keep adding layers as you wish, using a variety of stencils, overlapping the borders of the colours on the canvas.

For added texture, I sponged paint through punchinella, made marks using the edge of the credit card and using balck and white paint, applied random pieces of alphabet and Memory Maze number stencils - these are defintely a favorite.
I hope you enjoyed this project and if you are interested in any of the Memory Maze products, be sure to contact your local craft store or Memory Maze for your local stockist where we can place our local sales reps in contact with them.

Saturday, July 21, 2018

Mixed Media Canvas by Sarah

Hello crafty friends, Sarah here with a mixed media project using some of the alphabet and number stencils from Memorymaze. Lets' take a look...
This 16X20 inch canvas sheet was largely inspired by the artist Nina Ribena. If you havent seen her work, she does some great Youtube tutorials that are easy to follow along with. I started by covering the canvas with swipes of colour using an old credit card. I used a mixture of dark and light but you could apply what ever colours you iike.
From here you then build the layers using stencils and other objects. I used a variety of Memorymaze stencils for this project. Some of my favorite at the moment are the individual letter and number stencils. They are 40mm and perfect for this kind of project to add to the background but would be fantastic for cards or scrapbook layouts. You can see the "A" and "2" on this project. Stencilled in black, they make the background colours just pop!
Once you have applied layers of colours with various stencils, you can use items such as bottle tops, edges of a credit card to make further marks on the canvas. The difficult thing is knowing when in fact to stop! Let's take a closer look at some elements on the canvas.
I hope you enjoyed this project and will give it a go yourself. Pull out your stencils....maybe buy some more....and have some fun! I'm off to play with some more colour combinations on some more canvas pieces. Until next time....

Wednesday, June 20, 2018

Mixed Media Chipboard tags with Sarah

Hello crafty friends, Sarah here with you to showcase the amazing chipboard tags by Memory Maze. There are 18 different designs and can be found on the website here.
These chipboard tags are 130x50mm and are ideal for tag swaps, creating bookmarks or an off the page project. For this post, I used Distress Crayons to jazz up the tag. Lets have a look at the naked tag first so you can see the full design.
Firstly I adhered some die cut shapes to the tag. This creates texture and interest on the tag. I then covered the whole tag with white gesso. Gesso acts as a primer and because I wanted to move the distress crayon around on the the tag, gesso was the best base for this to easily occur. I applied three colours of Distress Crayons to the tag and smudged them using a baby wipe. I then applied some stamping using black archival ink.
I applied a little more gesso with my finger over the die cut area to add some defined areas and finished off the tag by adding some Prima Opal Magix wax in Vintage Silk to add some shine...beautiful! Outlined the edges of the tag with black ink.
Here is an example of a tag, a different design, where I did not add the die cut pieces at the beginning and did not apply gesso to the background. The colours are not as bright but I like it for a varied effect. I added a small photo to this one as a little memento piece.
If you are interested in any of the Memory Maze products, be sure to contact your local craft store or Memory Maze for your local stockist where we can place our local sales reps in contact with them.

Saturday, June 16, 2018

It's only a Dream with Sarah

Hello crafty friends, Sarah here with another scrapbooking layout, this time showcasing the amazing new acrylic words from Memory Maze! You'd have to agree that the blue colour of the acrylic in this layout is just stunning!
This photo was taken recently when we did a street tour of some artwork in Frankston, Victoria. A number of artists have contributed around town to some magnificient pieces of work. The Alice in Wonderland series outside the Frankston library would have to be my favorite though.

This 6x8 inch layout (seems to be my new size lately) was created using background cardstock with some gelli printed deli paper adhered to it with gel medium. The gel medium allows the deli paper to "melt" in to the background of the surface it is adhered it...lovely! A bit of black stencilling on the top left and bottom right corners of the layout broke up the colours a bit. Given I loved this photo so much, I enlarged it and simply adhered it to black cardstock. This complimented my son's black tshirt and broke up the colours from the background.

To complete the layout, the 'dream' acrylic word was adhered along with some letter stickers to make up the title. I used some chipboard feathers from Memory Maze that can be found on their website here. I covered the feathers with Versamark and gold embossing powder. I love how they look once embossed - so shiny and beautiful. They were adhered down and to finish off the layout, some Dylusions blue paint added with my finger around the edge of the layout. This paint compliments the colour of the acrylic piece and is a nice finishing touch.
If you are interested in any of the Memory Maze products, be sure to contact your local craft store or Memory Maze for your local stockist where we can place our local sales reps in contact with them. The new products for June can be found on the website at http://www.memorymaze.com.au/

Saturday, June 2, 2018

Mixed Media Layout 'My Boys' with Sarah

Hello crafty friends, Sarah here with a mixed media layout for you today using a number of fun ways to add to the background of your scrapbook layouts or memory keeping formats.
The background of this 12X12 inch layout was created with acrylic paints, printing with the 6 inch round gel plate and distress crayons. To create a watercolour affect, the crayons are applied to the background page and 'activated' with a wet paint brush. For this layout, I have allowed them to drip off the page for additional texture. I stamped onto the background using the Distress Crayon to colour the stamp. I used Darkroom Door, kaiser and Memorymaze background stamps.
The layout was finished off by some marks with my Posca Paint pens, and background script stamping (Kaiser) with black ink. The chicken wire chipbaord pieces are from Memorymaze and have been coated with Finnibair metallic wax paste. The shimmer this wax provides is awesome!
The chicken wire chipboard comes in a larger size, 12x12 and a 150mmx150mm piece as shown here. Black stencilling with acrylic paint was added for contrast. The layout was completed with a doodled border using a black fineliner. If you like this layout, I'd appreciate you leaving a comment below.
If you are interested in any of the Memory Maze products, be sure to contact your local craft store or Memory Maze for your local stockist where we can place our local sales reps in contact with them.

Sunday, May 27, 2018

XOXO with Sarah

Hello crafty friends, Sarah here with another 6x8 inch scrapbook layout using some Memory Maze acrylics, chipboard, stamps and stencil.
This layout is of my younger son cuddling our puppy - it's just adorable and I wanted the photo to be the main focus of the layout with a subtle but effective background. I used a brayer to create the various colours in the background, taking the palette from the photo - mainly reds with a bit of blue. I then used Memory Maze rubber stamps coloured with Posca paint pens to stamp on the background.
The title was also coloured using a white Posca paint pen. The title is a chipboard piece that can be found online here. I added some stencilling with black paint to the layout using the Noughts and Crosses mini stencil.
I finished the layout with adhering the photo and heart acrylic embellishments. I love how the red hearts compliment the colours in the photo.
I hope you enjoyed this layout and will give this mixed media look a go on your projects. If you are interested in any of the Memory Maze products, be sure to contact your local craft store or Memory Maze for your local stockist where we can place our local sales reps in contact with them.

Saturday, May 19, 2018

Gel print tutorial with Sarah

Hello crafty friends, Sarah with you today with my greatest love....gel prints using a number of layers but in just one single pulled print....lets take a look...
For these prints, I have used my 3X5 inch gel plate and the idea is to add layers on to the plate, allowing them to dry in between. I have broken this down step by step as below;
Firstly, apply your paint on to the plate and begin by adding some layers - here I have used some bubble wrap and the Memory Maze noughts and crosses stencil.
I then applied some paint to my rubber stamps and added this to the plate. The range of Memory Maze rubber stamps can be found online here.
Then using another of the Memory Maze mini stencils, I applied a darker contrasting colour.
A bit more stamping and now to let it dry.
Next we apply a thin layer of white paint. This must be thin otherwise it will only pull off the last layer added to the plate.
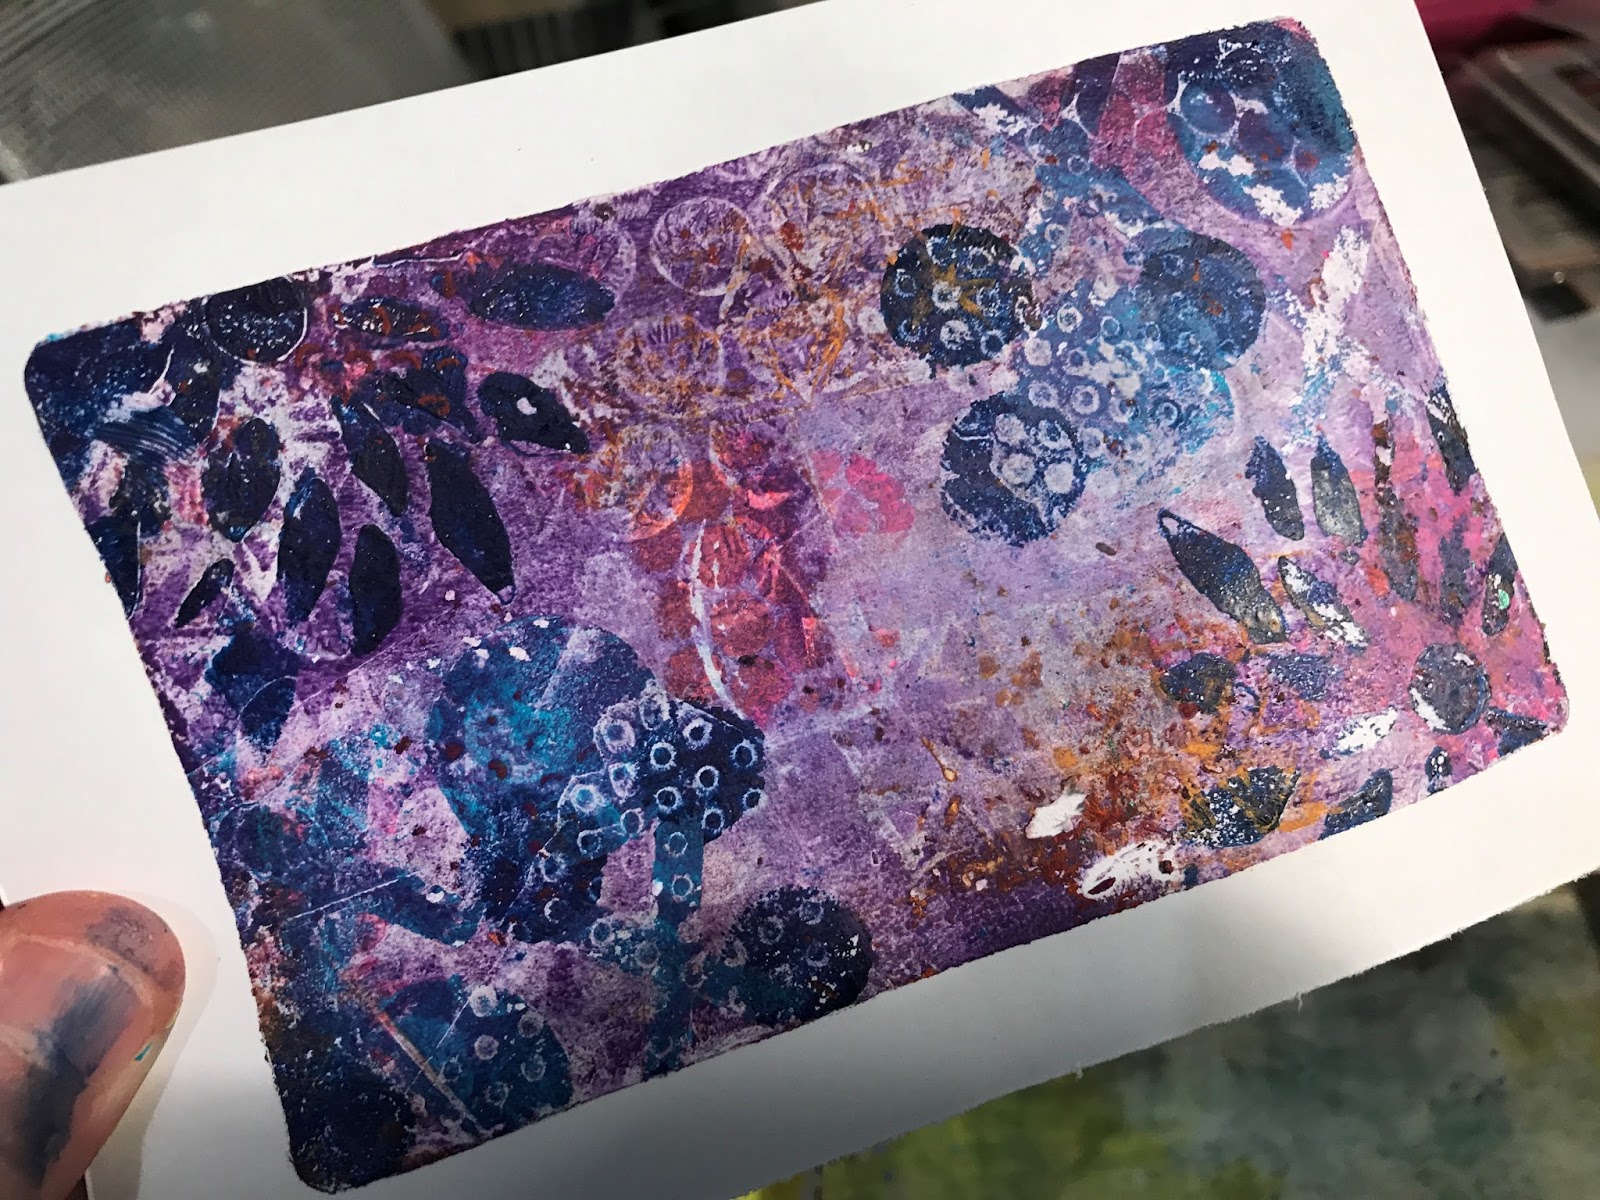
Press a piece of cardstock or paper firmly over the plate, rubbing all over to ensure there is good contact between the paint and the paper. Pull it up gently to reveal the print.
This is so much fun! Stay tuned for more projects where I do a similar technique on various sized Gel plates! Lets take a close up look at this print.
If you are interested in any of the Memory Maze products, be sure to contact your local craft store or Memory Maze for your local stockist where we can place our local sales reps in contact with them.

Tuesday, May 15, 2018

New Product Release: Stencils

Hello crafty friends, another new release this month from Memory Maze Lasercuts - a number of fantastiic stencils! Lets take a look....
All the new releases for May can be found online by clcking here. Pictured above is the Pathway grunge stencil. Lets jump right in to seeing some of the others;
These two stencils look stunning coupled with our new acrylic dream catcher - keep your eyes out for this coming up soon! These stencils are available in multiple sizes and this can be selected on check out. They also look lovely as border stencils for mixed media projects or layouts.
These are the broken circle and arrow stencils - great for any project, including backgrounds for cards, creating layers and texture on mixed media projects etc. Next up we have a new face stencil named 'mystic lady'. This is also available in a variety of sizes.
Lastly is one of my favorites - skeleton body. This stencil is available in various sizes and also has an option of coming with the skeleton head also.
If you are interested in any of the Memory Maze products, be sure to contact your local craft store or Memory Maze for your local stockist where we can place our local sales reps in contact with them.