Sunday, February 28, 2016

Altered Cigar Box - Candy Chelepy

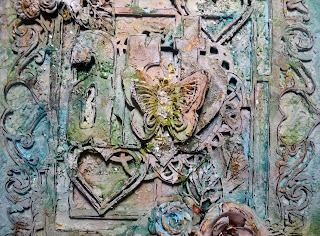
Hello again everyone today I am sharing with you all an altered cigar box. Hope you all enjoy the tutorial that goes with this. I was given some wooden cigar boxes from a friend of ours and I thought I would decorate one for his daughter, as a thank you gift. 


I started with the cigar box and pulled the paper from the inside and out. Some of it was hard to get off so I left it on there for some added texture.
 I then painted the inside and outside of the box with white gesso. You may have to give a couple of coats to cover the paper.
I have used a chipboard heart panel for a mask. I have been thinking of different ways to use these.
I used some Liquidtex light modelling paste and put the hearts all over the top and sides of the box. This went on really thick so I left to dry overnight.


Using some metal pieces from my stash, large flowers, leaves and a butterfly also a cute little fairy. And a couple of swirls around the flowers and leaves.  I glued these onto the top of the box with strong glue, I use Helmar 450. 


When these have all dried I painted gesso over the top and also all over the box. Then when that was dry I used Lindy's sprays Bonjour butter, Callifornia poppy gold, Plumeria pink, Rusty lantern lime, tea pot purple and T- bird turquoise. Spray these over the top and a little around the sides also I sprayed Plumeria pink inside the box. I went around the edges of the box with metalic grape gelato, wet my finger and blended in. Then I applied some gold crackle texture over some of the flowers, leaves and hearts. You have to let this air dry as it crackles better that way. When it was dried I went over the top with white gesso to tone it down a bit.


I have added some glass glitter (green), victorian velvet distress glitter, light pink art sugar and distress clear rock candy dry glitter around and on the flowers and leaves and some white opal liuid pearls on the swirls. 


Memory Maze products used


Thank you for visiting 

Candy Chelepy 
Memory Maze
2016 Design Team 


Saturday, February 27, 2016

Jason Anesbury Design Team Share

Welcome to my Memory Maze blog today I will be sharing with 2 Layouts.

Such A Cutie

With this amazing Memory Maze Chipboard frame an title Such A Cutie I did this Amazing Layout.

With the Chipboard Frame I painted it with Gesso I did 2 coats of Gesso.

When Dried I used Tim Holtz Inks Mermaid Lagoon, Festive Berries, Carved Pumpkin.

I used my finger an dabbed into the ink an smeared over the frame to get the distressed affect that I wanted .
When dried I went over With this Amazing Frame from Memory Maze with Glitter Glue.

With the title Such A Cutie I painted it with Dina Wakley Paint Turquoise I did 2 coats with the paint, when dry I went over with it with Crystal Effects.


I have used he following Memory Maze Products


Such A Cutie Title
 Master Chef 

With these Amazing Chipboard Products From memory Maze I was able to make this layout.

For the Chef Hat , frames , master Chef I Painted them white with Dina Wakley White paint.

When dried I Used Dylusion Ink Sprays Lemon Zest, London Blue, Pure Sunshine, Postbox Red.

I randomly sprayed the inks to get the effect I wanted .

When dried I went over with Crystal Affects to get this Amazing look..

With the White Arrows I used Dina Wakley paint White when it dried I use Crystal Affects.

For the black Arrows at the bottom I used Dina Wakley night paint ,when dried I used Crystal Affects to finish it off what an amazing effect it gives.


I have use the following Memory Maze products;


Thank you for checking out my memory maze post
Jason Anesbury 2016 Memory Maze team member. 

Monday, February 22, 2016

Hey Good Lookin' Canvas - by Toni Herron

Hey good lookin'... DT Toni here to bring you a fun boys canvas featuring plenty of Memory Maze chipboard and products from a MM stockist (D'Lish Scraps)  monthly kit.
 

Just Be You


First of all, like normal I start out by placing down some of the products in places that I think I will stick them down. This gives me plenty of time to figure out exactly where I think something will work great of not or what will go with what. It also helps with the selection of colours for the chipboard pieces also.
 
To prepare the base of the canvas I simply painted it over with some White Gesso.
I knew that I really wanted the focus of the canvas to be on the beautiful cheeky photo. So I used the colour of his shirt to stamp randomly to assist with highlighting it. There are also some Clear Impasto on there using a splash dots style Memory Maze stencil mask.
 
For the chipboard I used some very basic techniques to colour them. Using just black paint, Grey paint (barb wire has been sprinkled with distress glitter) and inked. However notice the COGS! That is actually ONE CHIPBOARD PIECE, SPLIT IN TWO! I love this technique as it gives me the same design for the price of one! Woo Hoo!
 
When the chippies were drying I took the opportunity to get a start on the canvas layout.
First was the black wire mesh design, the photo, the flags and frames with the barbwire slipped underneath once it dried. Some cute flair buttons and bowtie from the kit to finish off this cluster.
 
There are these cool bricks placed around the canvas. There is a method to this random madness though! There are sets - 1, 2, 3, 4 & 5 pieces to each grouping.
 
Here is a close up of that split Cogs set that I mentioned before! Did you know that since Memory Maze chipboard is so thick, it can actually be split into three!! I only needed for this project.
 
Memory Maze products used;
 
Brick Wall
 
ATC  locks and frame
 
be true to yourself 200 x 200  priced each  min buy 3.
 
ATC frame 6 hole with micro elements and stand
 
Barbed Wire 3 strips = 90 cm


Thank you for joining me today
Toni Herron
2016 Memory Maze DT member


Friday, February 19, 2016

BOY's at PLAY


Hi Everyone , my turn to post again,
I have been having a great time scrapping, not enough time as usual.
This  time I am focusing on


 " Boys at Play"


This layout showcases the Memory Maze Ravie 40mm Alphabet , and a new laser cut Card stock  
product call the Scenic Rim. 
This is a range of card stock laser cut images that can be used for your Scrapbook, Card making or off the page projects.
I have inked the Scenic page and included it in my page for effect. 


   You can see I have inked the edges and applies a black marker around the edge for effect,and added some gloss dots


For the Alphabet , I have inked in chocolate ,sprayed with a metallic ink , punched holes in the letters and applied gloss.
This is one of the loose Alphabets available from memory Maze , Alphabets are available in packs of 25 of each letter or number  in 20 and 40 mm letters in 5 different alphabets
or top up sheets like the one attached .


Monday, February 8, 2016

Art Journal cover - Candy Chelepy

Hello everyone, hope you all had a wonderful Christmas and New Year. I know I did a very quiet one for me this year. 
Today I have been wanting to decorate the outside of my Mixed Media Art Journal, so here goes. Ready to get your hands dirty, very very dirty.


I am using a A4 art journal and I had an old art canvas that I didn't need anymore. So I cut the canvas from it and then laid the journal out flat, cut around the edge leaving about 2 inches around the edges. I used matt medium to glue this together. You will need a good strong  glue to keep this from coming off. 

I left this to dry overnight. Open  your journal up and place face down, this makes it easier to work with. I then used my Memory Maze spotty mask and texture paste and covered all over the back and front of the journal. Let this dry then from my stash I used a script mask  and did the same thing. This is giving you texture. Make sure this is dry.
I gathered my Memory Maze chipboard pieces, some metal bits and pieces and a couple of resin flowers. I cut the word Art from some scraps of chipboard I had on hand.
 I then placed all my pieces on the front of my journal where I wanted them. I then took a photo with my phone so I new where to place them back.


Once this was all very dry. I had some Golden crackle paste and spread it around and over the chipboard and my cover. Let that dry well before you start to add colour. I did this on the back as well as the spine, you want it to come together as one. I let this dry naturally as it will crackle better.
 Cover everything with gesso so it is all white. This is so the coulor will show up nicely. These are the colours I have used Lindy's sprays - Califronia poppy gold, Time travel teal, T - bird turquoise and Red hot poka orange. I used a water spray bottle to blend them all together, but dry in between the colours or you will have mud.
After this is all dry I added some bling I used Gold gilding chips, Velvet and stirling glass glitter I have used matt medium to glue these on I then heat set them and the gliding melted a looked really lovely. I glued it around the flowers and the middle section.
 I had some gold Rub n buff and went over the textures and the outer edge of the journal.
 Everything seemed to get a bit lost so I went over with some white gesso, just the flowers etc and the raised bits with a dry brush method.
I then used a black gel pen and doodles around and over all the raised pieces. This helped everything to stand out. 


Memory Maze product


fancy frame 2  200 x 200   8x8   min buy 3

Vintage lace frame 10 inch or 200mm


Hearts geometric  100 x 180 min buy 3  Memory Maze

Thank you for visiting
Candy Chelepy
2016 Dt Member
Memory Maze