Tuesday, August 30, 2016

ELI BIRTHDAY CANVAS - By Jason Anesbury

Welcome to my Memory Maze blog today I be sharing with you Birthday canvas

ELI BIRTHDAY CANVAS

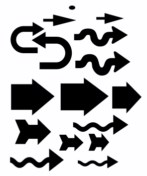
I started of by using Gesso all over the canvas , when the canvas was dry I chose this amazing Stencil by Memory Maze Called Arrows All Messed up Positive  Template . I put the stencil randomly over the canvas an I used Tim Holtz Distress Grit Paste.
When dried I sprayed randomly with Dylusion spray Squeezed Orange  & fresh Lime
an Kaiser craft mist yellow also colour blast Deep water.

With Elis Birthday Sign I painted them with Dylusion Candied Apples  an when dry I used Dusty Attic Glass Varnish for this amazing finish .

For the fount Dozer  (awesome chipboard ) I used Dina Wakley Nite paint For the tyres an I used Dylusion paint pure sunshine an Slate Grey for the body of the dozer , when dried I went over it with crystal effects.

The Tractor (wow) I used Dina Wakley  nite paint for the tyres , an the body I used Dylusion Pure sunshine an slate grey for the body when dried I used crystal effects for the finish.  


I used the following Memory Maze products


Thank you for checking out my memory maze post
Jason Anesbury 2016 Memory Maze team member. 

Sunday, August 28, 2016

Super Hero | Tarrah McLean

Hi everyone!

It's Tarrah McLean back with you and today I have a new layout to share featuring some awesome Memorymaze Chipboard!


Memorymaze Around the Block 12 x 12 Multi Frame


Hero Title 


I used some inks to colour my chipboard pieces. I used yellow for the Hero title and I used black Staz-On for the frame.

Thanks so much for joining me on the Memorymaze blog today!

Happy creating!

Friday, August 26, 2016

Dads Girl Layout


Hi everyone, Marelle back with a layout using the gorgeous Memory Maze "Dads Girl" Title.

For this layout I coloured my background with my faves Dylusions sprays, Acrylic Paints, Market 49 stamps and muslin.

I painted the title with Acrylic Black paint from my stash and then lightly sanded it randomly.


Until next time,
Happy Scrapping 

Love Marellexx

Wednesday, August 24, 2016

'Live your Dreams' by Elisa Ablett

Hi Crafter's

Elisa here from the Design Team sharing my next creation with you today, a very colourful Art Journal page using some gorgeous Memory Maze Stencils and Chipboard frame and of course some (ok lol maybe lots) of Colour Blast mixed media products.

This Art Journal page started off as a practice page in my Art Journal for the new Tim Holtz Distress Markers and then i  re-purposed the page by adding layer upon layer of Memory Maze stencils and Colour Blast until i had a very vibrant page with depth and texture.


After i added the Colour Blast Shimmer Dusts in Candy, Navy, Lush, Grape and Sunflower (add a small bit of the Dusts and add water) to the right side of the page, i used a circle stencil from Memory Maze with a white sharpie pen on the left side of the page. 

Next step was to add Colour Blast Mica Powder to Prima Crackle Texture paste and spread through a mini bubble stencil from Memory Maze with a palette knife.

I also used a white sharpie paint pen to trace around a love heart stencil on top of the watered down Colour Blast Shimmer Dust on the right hand side.

Also spread white texture paste through a chevron stencil with a palette knife and sprinkle the paste while it is wet with Colour Blast Embossing powder and heat with a gun til it bubbles...


With your chipboard frame, colour it with white gesso or a white paint sharpie pen and then add a small amount of Colour Blast Shimmer Dusts to the frame with a paint brush and water. Flick watered down white acrylic paint over the page.


Here are some of the Memory Maze products that i used!!

Stencil,mask or template J001 ALL CIRCLES  110X180   Min buy 3


Oblong Mini frame ornate app 100 x 85


Stencil Grunge 8


Thanks for stopping by the blog today, make sure you head on over to Memory Maze Shop via the link above and check out all the amazing designs.

Make sure you leave some love...

Thanks

Elisa xx


Saturday, August 20, 2016

Sunshine with Candy Chelepy

Hello another month has quickly gone by nearly the end of August already
wow.... I am sharing with you all my layout that I have completed for Memory Maze
a little Queensland chipboard company form Hervey Bay.


Firstly I have started with some pattern paper and cut this down half inch two sides, then using the martha stewart border punch, punch messy around your edges. Then tape this to the white cardstock.

I mixed some white gesso with water and brushed the background as I wanted to calm the background down a bit.

I have used Patina texture paste and the mask and applied onto the layout. Let this dry well I used a heat gun and made it bubble. You know how I like the texture thing going on.


Now for thr oval frame, heart pieces and the word Sunshine coat well with the white gesso.
I used the Merci Beaucoup embossing powder on the oval frame and heart pieces.
Then the Silver Moon Mistletoe embossing powder on the hearts and the word Sunshine.

Glue all these pieces onto your background then add your flowers and splatter with some white ink.
Don't forget to cover your photo.


Memory Maze products


Circles  nested   150 x 150mm min buy 3


Sunshine 115 x 50  Script  min buy 3

Heart Pendant 100 x 150    Sold in 3\'s  flourish

Other products

White Cardstock
Kaisercraft Telegraph Road Collection - Letter
Gesso and mask
Shimmerz texturez Patina paste
Lindy's embossing powder - Silver moon mistletoe and Mera Beaucoup Mint
Versamark
Liquidtex ink -  titanium white
Martha Stewart border punch
Prima flowers and leaves


Thank you for visiting

Candy Chelepy
2016 Design Team
Memory Maze

Saturday, August 13, 2016

Travel the World | Tarrah McLean

Hi everyone!

It's Tarrah back with you today to share another layout using some awesome Memory Maze Designs chipboard!


I love creating travel themed layouts so when I saw the camera, the arrows and the words 'world' and 'together' I knew they would be perfect to incorporate into my page!

I inked all the pieces of chipboard in a variety of colours to fit with the colours in my layout, I find inking my chipboard is the best for me as its quick and not too messy! I am such a non messy scrapper!

I used a cut file also on this layout.....this is one of my favourite things to do when I scrapbook...it often helps me with the way I am designing my page! 

Here are the sets of Memorymaze chipboard that I have used on this layout!


Thanks so much for stopping by the Memorymaze Designs Chipboard blog!

Happy creating!


Tuesday, August 9, 2016

'Happy' by Elisa Ablett

Hi Crafter's,

Elisa here from the Design Team with my next creation for Memory Maze, a mixed media layout featuring some lovely Memory Maze stencils and chipboard and of course some Colour Blast.

To create the background i sprayed Colour Blast 'Love' and 'Carribean' Colour Sprays and 'Just Blue' and 'Fire Engine' Shimmer Sprays over the top of the Grunge stencil. I only sprayed across the page trying to keep to the middle as much as possible. 

Once dry I used the circle stencil and using a blue Fuseball pen by Ranger i traced random circles over the sprayed background and then using a paintbrush and a blue water colour paint coloured in most of the circles carefully.

While that was drying i gave the netting chipboard and a couple of the shells a coat in gesso and spread 'Just Blue' Colour Blast Paste over them using my finger.

With the other shells i heat embossed them with Colour Blast Embossing Powder in Just Blue and then while they were drying i rubbed a small amount of watermelon Mica Powder from Colour Blast over the embossing to provide a contrasting colour.

I matted my photo in white and black, used some medical gauze in the background behind the photo and added some splashes of the colour sprays to finish off. Assemble your layout layering your elements! 

Here are some close ups!!


Here are the lovely Memory Maze products that i have utilised to complete this layout. They can be found in the Memory Maze Shop here - http://www.memorymaze.com/


Stencil,mask or template J001 ALL CIRCLES  110X180   Min buy 3


Stencil Grunge 10


seashells at the beach 100 x 150 min buy 3


seaside net,turtle pelican anchor turtle 110 x 180


Well that's it from me today, join me in a couple of weeks for my next project on the 24th August 2016.


Thanks for stopping by the blog today, make sure you leave some love ....

Elisa xx


Friday, August 5, 2016

Christmas Tags with Candy

Wow how the year is flying it will soon be Christmas before we know it. So I have decided to try and get ahead and do some tags for some special people in my life. 
This weeks Christmas tag tutorial is for Memory Maze

I have dived into my mighty stash and found some Christmas decoration and Merry Christmas chipboard words. All the tags are 6 1/4 x 3 1/8 inches and I have used my christmas stash. Firstly paint all the chipboard pieces with white gesso.

Tag 1
Using the bauble decoration and the Merry Christmas word. I squeezed some red, green and gold kindy glitz onto a plate then using my finger daube all over the chipboard pieces. When that is dry use some white opal liquid pearls and daube around the outside of each bauble etc.Even on the Merry Christmas word. I have used some green cardstock cut to the size required then some Christmas paper, embossed white cardstock, fancy border and a stamped frame to complete the tag.


Tag 2

Using the raindeer / tree decoration and the Merry Christmas word cover withsome Perlen pen its like perfect pearls and a paint brush, brush over the chippboard pieces. When this is dry add some crystalina kindy glitz to the tree and gold perfect pearls around the edge and when that is completely dry cover with some dimensional magic.
 I used some red cardstock, christmas paper , embossed white cardstock, stamped image to make this tag.


Tag 3

I had some smooch in my stash and needed to use it so I covered the Merry Christmas word and decoration. When this was dry it took a while but dried finally. I put some gold kindy glitz on my finger and daubed it around the decoration and on the word.


Memory Maze products


Christmas bauble decoration, Customise your own , approx 85 x 11


Christmas tree and reindeer  decoration approx 80 x 110 mm pack


Christmas tree and reindeer decoration, Customise your own , app


Merry Christmas 45 x 36


Other Products used
Green, white and red cardstock
Paper Inkling Christmas papers
Snowflake embossing folder
tag stamps and green ink
Kindy Glitz green, red, gold and crystalina
Liquid Pearls white opal and gold
White gesso
White ribbon
Viva Perlen pen red, green, cream, brown and white
Smooch green, red, gold and yellow
Dimensional magic

Thank you for visiting

2016 Design Team
xxx Candy