Thursday, July 28, 2016

Summer Fun | Tarrah McLean

Hi everyone!

It's Tarrah McLean back with you today to share a new scrapbook layout using some awesome Memorymaze Chipboard!

I decided to create a Summer themed layout as I am hating this cold weather right now! I used the largest and the centre piece from the Pinked Circles chipboard pieces and coloured them with red and orange inks..I was trying to replicate the sun by using both of these chippie pieces...


I inked the 'Sunshine ' word in tropical green ink from the Sunshine Word sheet and adhered it near the other words included on the background paper..


I also inked that super cute pair of sunglasses and adhered this to the top left corner.. 


Here are the awesome chipboard pieces I used from the Memory Maze Designs store!

Sunshine word sheet sold 3\'s
Mini glasses moustache pipe and hat 100 x 150 sold in 3\'s

Just pinked Circles 200 x 200 mm

Thanks so much for stopping by the Memory Maze Designs blog today!

Happy creating!

Sunday, July 24, 2016

'Dont forget to Fly' by Elisa Ablett

Hi there everyone,

I'm popping in to share a mixed media card that i created for my second post for Memory Maze.

I loved creating this card using a combination of Memory Maze stencils and Chipboard and some Colour Blast Australia mixed media products.


I used a gorgeous flower stencil with three new colours of Colour Blast Colour Sprays including Sunset, Bubblegum and Saffron sprayed in lines across the stencil which is placed on the card.


Once dried i stamped a few black circles and script texture stamp and splattered a few drops of the Colour Sprays on the front of the card, and then when dried again i used a second stencil from Memory Maze with Bling Colour Blast paste.


Add a little black thread and a gorgeous butterfly chipboard piece embossed with multiple colours of Colour Blast embossing powder and your sentiment and you have yourself a lovely mixed media card.


Here are the gorgeous Memory Maze products i used to complete my project.


 Butterfly Corner Small flourish  99mm x 99mm min buy 3


Dots and stuff  poly template  8x8 sold in 3's

Stencil,mask or template J057  110X180   Min buy 3


Make sure you head over to the Memory Maze Shop to view the gorgeous products and find a stockist close to you :-) 

Thanks 

Elisa Ablett


Friday, July 22, 2016

'Fierce' Art Journal page by Elisa Ablett

Hi Everyone, 

Welcome to my first official blog post on behalf of Memory Maze!!

I am super excited to be on this Design Team and i am looking forward to showcasing the amazing Australian made products from Memory Maze.

As soon as i saw this gorgeous Lion Stencil i knew i wanted to complete an Art Journal page. 

I have alway loved this quote from Shakespeare and i wanted to create a tribal inspired 'fierce' page.


 To start, I used gorgeous Dylusions paints to create a very vibrant background, i used an old credit card to spread the paint around my page.

Then i used a Stampendous texture stamp to create some added depth and then used Colour Blast Dusty Charcoal Paste over the Lion Stencil in the middle of my page.

I then used Black Versamark ink to cover my selected Chipboard pieces from Memory Maze and used a white Uniball gel pen to add my title and white accents.

I also added some Acrylic Ink from Daler Rowney to add extra colour to my page around the Lion's head.

Here are some close up's of the page.


Here are the amazing Australian made Memory Maze products i used to complete this project and they can be found at


Remember When Vintage  100 x 150 sold in 3's

Remember When 
Frames and Overlays

Border Hook 3  flourish BULK  3 pack of 100 119mm x 23mm

Border Hook 3 
Bulk and Single Flourishes Corner

and

Lion Stencil


Thanks for visiting, see you again soon..

Make sure you leave some love 

Elisa Ablett xx


Wednesday, July 20, 2016

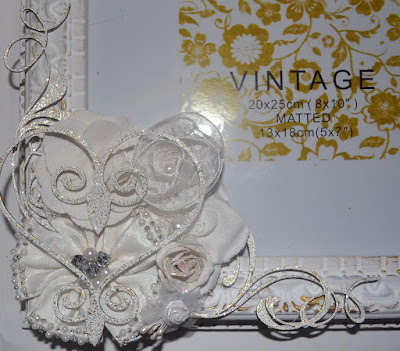
Decorated photo frame with Candy

Decorated Photo Frame

Welcome again to another tutorial for Memory Maze
Today I had to do a quick present for a wedding I was going to.
So I dived into my stash and pulled out this 8 x 10 inch fancy photo frame.


I pulled the frame apart and painted the frame itself with some white gesso.
When dry I gently applied some gold rub n buff with my finger over the edges of the frame.
I selected a few different chipboard pieces, swirls, butterflies and a large heart.
I covered them with white gesso, then applied embossing powder to all of them. 
Then using a strong glue glued the chipboard pieces and flowers to the frame.


Mmeory Maze products


Wrought iron 15


Butterfly


Other products used

8 x 10 inch photo frame
white gesso
 Gold leaf rub n buff
versamark
Stampendous shabby white embossing powder
Heat gun Prima flowers

Thank you for visiting
Candy Chelepy
2016 Memory Maze DT

Monday, July 18, 2016

Love Life!


Hi everyone, Marelle here with my first Design Team post !
So happy to be a part of this amazing Team.

Today I am sharing a layout of my Daughter Ella and her friend taken about 5 years ago - I just love the joy in their faces in this photo.

I have started off with my favourite Bazzill Marshmellow 250gsm cardstock, and sprayed Dylusions Sprays (Bubblegum Pink and Piller Box Red) with water spray making a drip effect!
Then I have used the amazing Circle Stencil over my background - I love this stencil as it has different sized circles on the one stencil.  I then used Faber Castell Gelatos in Red Cherry, Coconut and Guava. 

I painted the hearts in the amazing chipboard from Memory Maze and the negatives of the hearts in black acrylic paint, using the same black acrylic paint I formed a border for the page and added a title, white muslin behind my photo which I mounted on Bazill Black Raven cardstock.  I used X-Pressit mounting tape attached to my photo to give it some height.

Here is my layout and some close ups.


I look forward to seeing your layouts using the amazing Memory Maze Products.


Until next time,
Marellexx


Saturday, July 16, 2016

Awesome Dude by Tarrah McLean

Hi there everyone!

It's Tarrah McLean here for my first share as a new design team member for Memory Maze!
I have 2 sons so I scrap a lot of boy pages!


I used the Simple Stories 'So Rad' collection together with a selection of Memory Maze chipboard that suited the boy theme!

I added some coloured ink to some of the chipboard to add some colour to my layout!

You can never go wrong with using arrows on any type of boy layout!


That's it from me today! Stay tuned for another layout from me in the coming weeks!

Happy creating!


Friday, July 15, 2016

Loving Every Day mini cavas

Good morning friends, Toni here wanting YOU to get out of your comfort zone and try something new, because that is exactly what I did. It's not anything fancy, but it's new to me.

I have never played with Watercolour Paints and will admit I was terrified. I have made this small canvas topped with some great Memory Maze chipboard for my very first project.

Loving every day


Although I know it's not the "best canvas I've ever made", I still think it is important to share this with you as I want you to know it's ok to try things you have never tried before! I tried a few different things that didn't work out well, so fell back to basics. But that's ok, even as a DT member we all have moments that just plain and simple FAIL!


You will be able to find these products everywhere around you. Newsagents, Department store (Big W / Kmart) and even some budget $2 shops.

Since this is my first time, I wanted to keep it as simple as possible. No fancy Cats, sitting in a boat, on a beautiful lake, surrounded by flowing hills and trees.  No, No! Just a cute little sunburst design with straight lines was definitely going to be my limit for this project.
I started by using the Memory Maze stencil as my guide for the sunburst.


I used only 5 of the watercolour paints and spread them out on the canvas. Letting them dry I also added a Black boarder.
Please note some advice: Don't do this while wearing "nice" clothes, it somehow got all over my shirt and pants.
Next was the brick wall stencil and some Modelling Paste on the lower half, just to break up the colours and give the chipboard an extra background effect to sit on.

The swirl and Butterflies I coloured with a Silver Alcohol ink, then painted the words with the Black watercolour paint again. Here is where I tried many different effects that just simply didn't work. So I just kept recovering with the black.
The final touch was the lone black flower in the corner, which was made by Jan McKenzie.


Memory Maze products used;

Flower by Jan McKenzie


So go on, now it's your turn to go and try a new technique on your chipboard. It doesn't have to be fancy or maybe you do want to try something over the top?! Either way, we would love to see what you create. Experiment!

Thank you so much for joining me today
Toni Herron
2016 Memory Maze DT Member

Wednesday, July 13, 2016

Baby Love

Hi All and welcome to my second post for the month today I am sharing sa LO that uses some awesome Memory Maze products. 


I have used the following Memory Maze products


Thank you for viewing my LO Kim Kendell Memory Maze 2016 Design Team