Thursday, February 28, 2013

Amanda Lawrence - February DT share

I'm so excited to be bringing you my first ever design team post here at Memory Maze. I'm still floating on cloud 9 over the whole experience and really have to once again thank Sally for giving me this wonderful opportunity. I hope that over my next 6 months on the team, I can inspire you all to fill your stash with this wonderful product.

I have 3, never-seen-before layouts to share with you all today. They are all quite different in style which really shows off the versatility of chipboard in your projects.

Sweet Dreams my Little Angel


I've been carrying this photo of my daughter around for a while now along with all the supplies to create it. I had an idea of how I wanted it to look, but have been too scared to actually attempt it. I can honestly say that although it didn't turn out exactly how I envisioned {when does it ever} I am so happy with the result.


The background was created by inking through two different stencils in various areas. I then added texture by tearing and scrunching tissue paper and mod podging it over the top. You can see some of it under my main embellishment cluster.


For my smaller embellishment cluster I used a Border Hook 1 with a paper doiley folded over it to look like a hanging pennant. 


To create my title I used a Dreams mini word which I placed inside a Scalloped Name Plate. The name plate was simply inked and the word painted with a thin coat of white gesso.

Memory Maze products:
Border Hook 1 - S0147
Scalloped Name Plate - X0001
Dreams - G0011

Other products:
Glitz Design papers, Prima resin angel wings, Green Tara beaded spray, D-lish Scraps flowers, resin and paper doilies, embroidery thread, inks, tissue paper.

..................................................

Beach Shadows


This is a photo of my son and I at the beach over New Year. I had a grand plan to draw the heart in the sand and get the whole family in, not my best idea with a toddler who can't stand still!


The background for this layout was created by inking through a Crafters Workshop template. 


For my top cluster I used Wrought Iron 49 and added some of my embellishments to it. I wanted the chipboard to offset the dark shadows in the photo so I simply inked them black. 


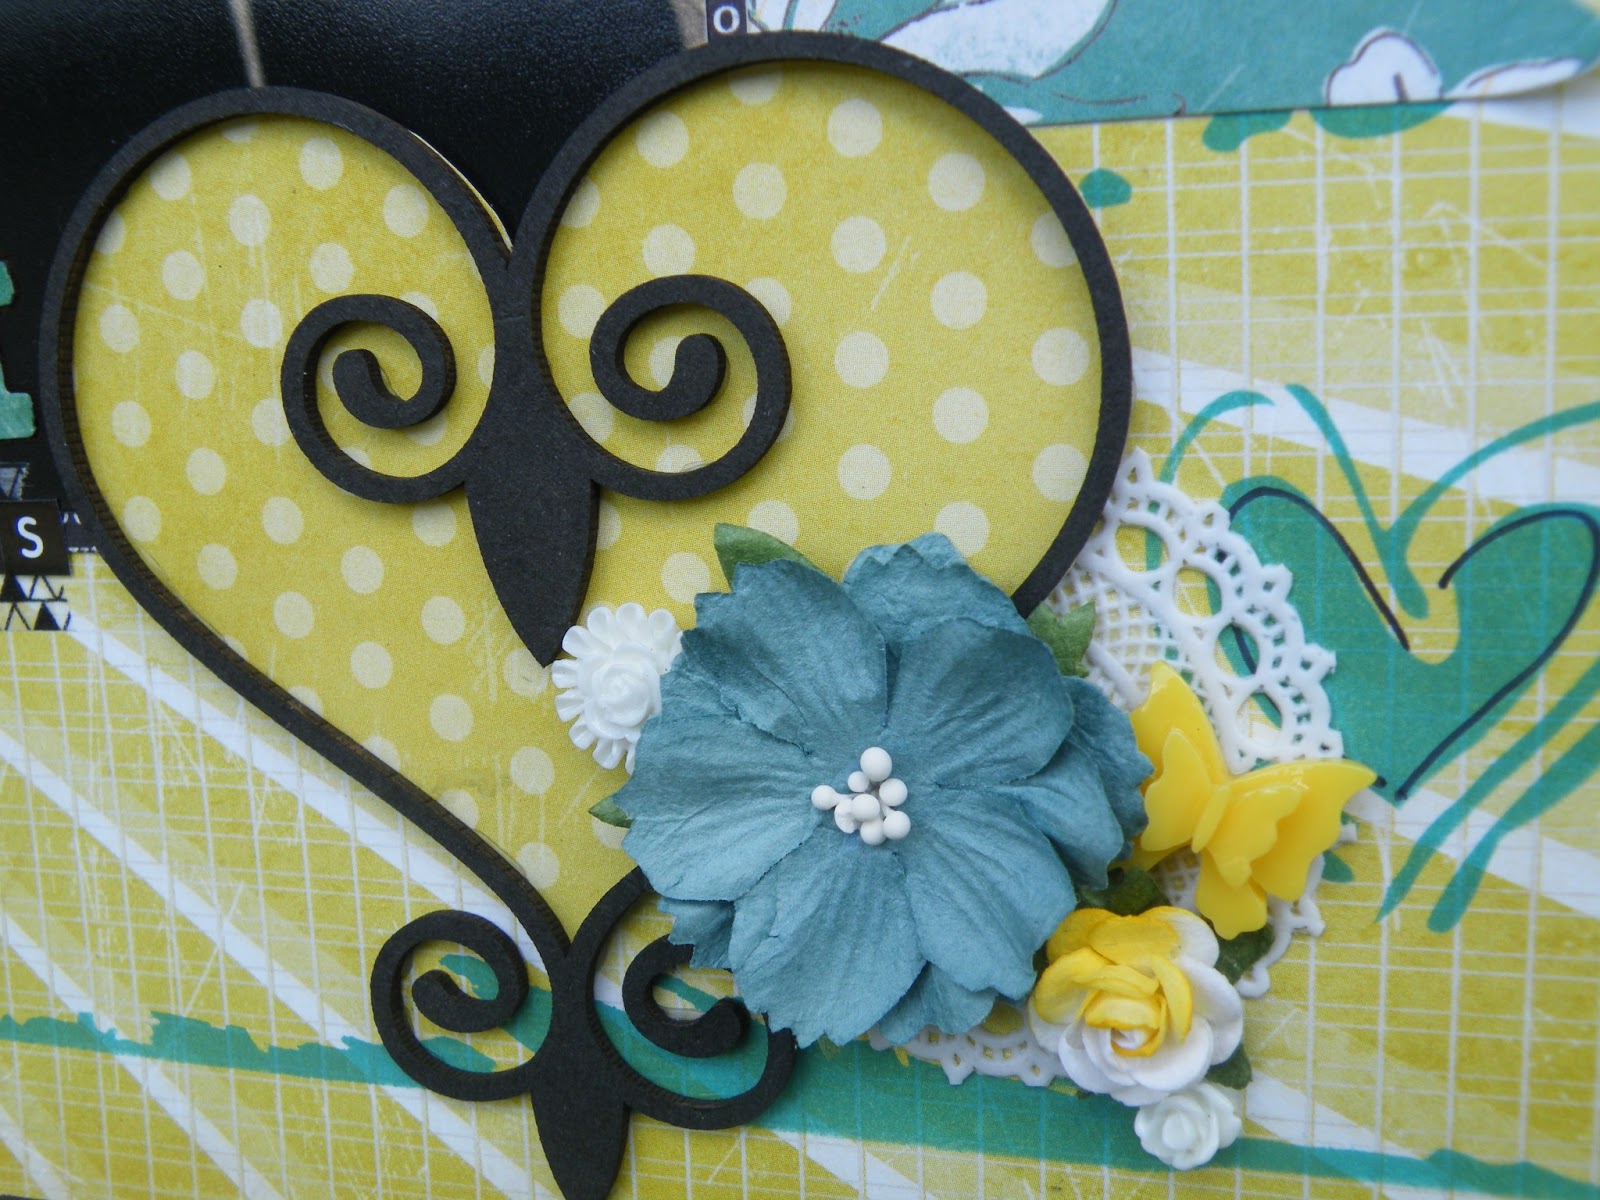
The lower cluster uses Wrought Iron 25. I inlaid the back of it with patterned paper to make it stand out more. 

Memory Maze products:
Wrought Iron 49 - S0449
Wrought Iron 25 - S0446

Other products: 
Crate Paper patterned papers, D-lish Scraps doilies, flowers, resin and washi tape, ink.

..................................................

Owl will always Love You


Some cute little selfies of me and my boy so I just wanted to create a fun and playful page.


I used the Love mini word as part of my title. I have coloured with some Twinkling H2O's to match.


I used a few different types of media to decorate my Owl on a Branch. Firstly I masked off the owl and leaves with some washi tape. I use this as it is low tack and less likely to tear the surface when you remove it. The woodgrain on the branch was stamped using a Kaiser background stamp. The leaves were inked and then the detail added on with a marker. For the owl I used Twinkling H2O's and white gel pen for the centre of his eyes.

Memory Maze products:
Love - G0044
Owl on a Branch - S0046

Other products:
Teresa Collins papers, Kraft cardstock, D-lish Scraps twine and beads, staples.

..................................................

Thanks for visiting today and I hoped you enjoyed my first post and projects for Memory Maze.

Amanda x


Tuesday, February 26, 2013

Hi from Susan Moy and here are my first designs for the Memory Maze design team....

'PERFECT'


I wanted to highlight my Mum and Dad's wedding photo so I kept the layout colours to gold and white and used texture to add interest to the layout.


The small square frame was covered with embossed paper and painted gold. The larger frame was painted white and pearls strips were adhered around the edge to give it a 3D effect.

"Perfect" was painted white then Plaid- Folk Art Extreme Glitter in gold was painted over the top.
The wrought iron heart was painted gold with the gold glitter painted over the top of it.
The vintage corners were painted in vintage gold acrylic paint.
The embossed paper was adhere behind the white frame.


The key was undercoated in gold paint then gold glitter was painted over it. The tassel was attached to the key before it was adhered to the smaller frame. The photo and the tulle were adhered behind the frame before putting it on the layout.

MEMORY MAZE PRODUCTS

Vintage Corners CO139
Old Key COO30
Wrought Iron Heart 25
Perfect GO196
Square Frames-mattboard Square set of 9 50-290
Embossed Paper-cream embossed rose HMP007

OTHER PRODUCTS
white bazzill bling, papermania-confetti, skeleton leaves, tassell, tulle, flowers, letter & verse stickers,die cut bird, gold & white acrylic paint, plaid folk art extreme glitter in gold.

.......................................................

"2012"


Even though these photos were taken at the beach I wanted the layout to be about the motorbike and the "boys being boys". So I added all the grungy raised pieces to give this effect.

To make this layout I first laid the photos where they were to go and marked around them with a pencil as I needed an outline to know where to stop putting the different mediums and embellishments. I put a strip of mesh tape in the corners and sponged on the pewter distress stain then lifted the tape and moved it to overlap the stain and the black background. I laid a mask of cogs next to the tape (top & bottom) and spread texture paste over this and down to where the photos were to go.

The chipboard pieces were decorated first and all the embellishments were laid out ready to go. I pushed and placed these into the texture paste and left it all to dry. Check to make sure the photos still fit in before it dries so you can move things if you have to but don't stick the photos down yet!
Once dry, I painted over everything with black gesso, leaving the silvery areas untouched and used my finger to smudge some gesso over the edges so it blended in without leaving a distinct border.


Areas of the layout were highlighted with the distress stain to give depth to the items and not make them look flat and all one colour. When the gesso was still wet I wiped across some of the metal pieces to show the details of the embellishments.


The motorbike was first sprayed all over with memory mist then black gesso was smeared on to give a shadowing effect. Brushed pewter stain was applied to hightlight the "chrome" areas of the spokes, guards and handlbars as well as on the rider to give light and shade to the figure. Distress Stickles (like glitter glue but without a lot of glitter) was used on the tyres to give them "tread" texture.


Distress Stain in Brushed Pewter was applied all over the 2012 then black gesso was smudged on using my fingertip pressed onto it. Distress Stickes in Pewter was dabbed around the edges of the number.

MEMORY MAZE PRODUCTS

Heel Click (motorbike) SO516
2012 CO122

OTHER PRODUCTS
black cardstock, Tim Holtz Distress Stain & Stickles - brushed pewter, texture paste, black gesso, mesh tape, assorted metal and plastic embellishments.

...................................................

"BLESSINGS"


With Easter on its way I thought this would make a nice "candy sweet" card.
The rose ribbon corners from the 3D Stackums were fussy cut and layered under the stamped tag. Gems were stuck on the corners to finish the tag. The front edge of the card was punched with a Martha Stewart border punch. The edges of the tag and the embossed paper were smudged with pink ink.


The bottom layer is handmade patterned tissue paper. The top layer of cream embossed paper has been lightly brushed over with pink ink. The bows were cut out from the 3Dstackums and layered together with the chick on top.

The chick and all the eggs were painted with pink, silver and gold glitter paint.

MEMORY MAZE PRODUCTS

Chick & Eggs CODE
Eggs CODE
Cream Embossed Rose paper HMP007
handmade pink tissue paper
3D Stackums- CODE

OTHER PRODUCTS
ric rac ribbon, gems, stamp & ink, white bazzill bling cardstock

I hope you have enjoyed seeing these layouts and card and have found some new ways to use your chipboard pieces. Happy Scrapping from Susan.


Monday, February 25, 2013

Hello...Hello....

My first post for Memory Maze....very exciting and great to be here....My name is Kylie. I'm what you could say the bright and fun one!!
I do hope to inspire you over the next couple of months and would so love to see your creations with these wonderful chipboard embellishments.
So my first share today is:

Sun Kissed


This layout is based on a sketch by Sara Noendeng for Scrapbook Savvy. I do love sketches - i sometimes stick to the original or mix it up a little. I love bright and fun papers, and i had the perfect photo of my daughter Kayley with one of her friends enjoying the summer weather.


Product ID : S0334
Product ID : L0092

I have coloured in the chipboard with some gel pens. These type of pens work excellent and come in many colours to highlight various parts of chipboard.
...................................................................................................................................................................


Our Little Lady


This layout is a just because layout. This photo of Kayley was taken while on holidays visiting the Museum in Brisbane. I looked at how old fashioned the pic that i took - then i looked in my goodie bag and found the perfect chipboard piece to match- so eligant...


Product ID : S0575

I left this piece of chipboard on my layout raw- i love the detail on this piece and did not want to alter it.

........................................................................................................................................................................

And lastly...

I will let you know a little secret....

I don't do alot of card making!!!LOL

But thanks to SALLY I may have changed my view on them totally!


Product ID : G0165
Product ID : S0348
Product ID : DS0021

The 3D STACKUMS-EASY CUT CARD MAKING SHEETS are so easy to use(if i can use them-then thay are!!!LOL) and there are so many themes to choose from in the shop.

So i do hope you have enjoyed looking over my creations......until next time...

Bye


Sunday, February 24, 2013

Today we have Ally back again as a GDT member

"As time goes by"


Ally has created this time zone page using some chipboard circles and a penny tharthing med


The penny tharthing has been inked in black, distress ink dabber in silver and a touch of green paint

Memory Maze Products Used

Circles - Z0009
Penny Tharthing med - S0606

"My Sweet"


This time Ally has not used any chipboard but has used one of the lovely Memory maze A4 papers, sorry about the reflection on the photos its been raining non stop here to couldn't find a nice sunny spot to take photos.


A beautiful swirl paper in purple and orange, all of the swirls are full of glitter

Memory Maze Products Used

Handmade paper glitter and embossed orange and purple swirl

Thanks for stopping by


Friday, February 22, 2013

Hi there everyone.
This is Julene Matthews and this is my first post for Memory Maze chipboard.
I've 3 projects to show you.

"HILDA"


This features a photo of my young grandmother. I went very pastel with this. 
I fussy cut around the edge of the backing paper(Ruby Rock-it August Moon) then inserted another matching shaped paper over it. I used muslin as my base mat with a pink heart doily on top. Then I added the chipboard frame which I covered with patterned paper and inked the edges using pinecone. I painted the scrolly bits white.

I've added some hydrangea blossoms,a butterfly and rub on words, lock and key.
Final touch was a pink velvet bow on the actual frame. Here's a close up,you can see how the muslin adds softness.


Memory Maze Products Used

Frame is X0003

............................................

"EVERYDAY HERO"

This layout features one of Memory Maze words "perfect" which I have inked in black.
I have also used a ginger coloured hand made paper as my photo mat.The rest of the layouts construction is self explanatory.


I made this layout for a sketch challenge on "Sketches in Thyme".

Memory Maze Products used

Perfect word G0196

...................................................

and the 3rd layout

"ADVENTURE"

 This features 3 pieces of memory maze chipboard.The circle, the word adventure are both inked in blue and the hot air balloon is inked with silver.


I started with the background papers,including the one featuring sketches of aeroplanes and the other with clouds.There is washi tape under the top cut out plane picture and ribbon and vintage buttons in the bottom left corner and under the plane.

Instead of a journalling block I've used a streamer from the hot air balloon, with mini alphas telling what the layout is about.I used the twine to link up the 2 chipboard areas.

Memory Maze Products used

Adventure word G0077
Circle M0001

Have a happy day from


Wednesday, February 20, 2013

New Design Team Starts

Today is my first official post as part of the new Memory Maze Design Team, Exciting news is that the team starts today, every 2 days we will have something new for you.

"The one that didn't get away"


I guess everyone has at once heard the saying the one that got away, well not this time. My mum made this photo using my 2 youngest girls.


Lots of memory Maze chipboard of this page.


Once again Ive used a circle out of the circle frames pack, there are so many circles in the pack its great value for money. This time I have used texture paste on the circle and then inked it in distress ink and used it to frame my photo.

I have also used the Fishing boy chipboard, the base has also been texture pasted and inked in the same colour as the circle frame, the little boy has been ink black and then a metallic silver used distress stain used with a paint brush to add slight highlights to him along with his fishing rod that has been done in silver. each of the cats were done in picket fence distress stain then using a paint brush i have added black and brown distress stain to the edges. the little bucket was done in silver and lines drawn in black and a little wire handle added.


I added more wire to the little boys fishing rod to look like a fishing line. Using a climbing vine i cut it into 3 pieces and rearranged 2 of them to look like a tree, it has been inked in white distress stain and the leaves done in green distress in then everything has had black & brown added to the edges.


I used a chipboard chicken wire and texture paste to create raised areas on the background. And stitching around the outside edge of the background paper.


Lots of Prima Flowers to finish it off.

Memory Maze products used

Climbing Vine 2 - L0054
Circle Frames - Z0009
Fishing boy - L0168

............................................................

This week I was sent a parcel full of Stackums card making sheets, now I'm not really a card maker but these take the hard work out of creating beautiful card.


Simple cut each lot of pictures out and layer them with foam tape 


Vintage car Stackums


I started by layering each of the pieces then I white washed the entire stackum to give it more of a vintage feel. and inked the edge.


A Memory Maze cog was cut in half and inked then also white washed


The other half of the cog


Side view of the layers


Products used 

Vintage Green Car Stackums - DS0187
Cogs - L0048

.....................................................


Pink Rose Stackum


I also white washed this stackum, I'm not a gold person so I wanted to tone down the gold elements


My wonderful 2yr old thought it would be a good idea to grab a piece of chipboard of my desk and start eating it, so to salvage this piece I cut it up into 3 smaller pieces, each piece has been white washed and lightly inked in pink


Side view of the layers


Products used 

Pink Rose Stackums - DS0017
Vintage Corners - C0139

..................................................


Frog Stackums


A cute card for any girl.


Memory Maze 16th chipboard inked in white then the edges inked in a pale blue


Cupcake chipboards done the same way as the 16th, handmade & Prima flowers


Side view of the Layers

Memory Maze Products used

Frog Stackums - DS0098
Cupcakes - C0034
16th - C0019

Thanks for stopping by, 
Don't forget to ask your local store about stocking Memory Maze Products

Linda xx