Wednesday, November 25, 2020

{Butterfly Dreams}

Hey there crafty people! Melissa A here with you today and I have a beautiful soft coloured DT layout to share with you created for the wonderful Memory Maze Lasercuts.


For this layout I have gone with a pretty butterfly theme and have used Mintay's card stock, as well as their fussy cutting elements.
For the background I sprinkled some pink pixie powder and sprayed it with water to get the desired effect, just to add some colour and then I did a little bit of stamping around the photo area.


I have used the gorgeous butterfly frame with the title from Memory Maze and I heat embossed it with both yellow and pink embossing powders. I did this with all the other butterfly chipboards used on this layout as well.


I used some beautiful soft yellow and pink Autumn Lane flowers, which worked in perfectly with this layout and also tucked some wood wool in between and around them for some added texture.


I hope you liked my latest creation, I will have some more for you all very soon! Until then...happy crafting! :)

Mel x


Products Used
-Mintay 'Old Manor' cardstock
-Mintay 'Beauty in Bloom' elements
-Autumn Lane flowers
-Memory Maze butterfly frame with title
-Memory Maze butterfly chipboard
-Kaisercraft 'Butterflies' background stamp
-Ranger Distress Oxide in 'Black Soot'
-Cosmic Shimmer Pixie Powder in 'Scarlet Mist'
-Unbranded embossing powder in 'Yellow' & 'Pink'
-Stampendous Fran-tage embossing powder in 'Shabby Pink'
-Wood Wool


Thursday, November 19, 2020

A very good morning to you all and welcome back to the Memory Maze Chipboard Blog.

Today I would like to share with you a layout about man's best friend. Lots of Dog related chipboard pieces on this layout which also uses the Doggy Dayz printed papers from Studio 73.

All the chipboard pieces have been covered in distress oxides in numerous colours, I love this stuff, it gives a perfect and easy cover for all your chipboard.

I also used the paw prints stencil to add extra pawprints and I think they turned out pretty cute.

Puppy Love


 I have used the following Chipboard elements:


- Puppy Love Sentiment
- Paw Prints Chipboard
- Dogs and Bones

- Stencil Paw Prints

You will find these and heaps more chipboard righ here:

Thanks so much for stopping by!

Hugs

Hetty

Wednesday, November 18, 2020

Oh Dear, Oh Dear, I shall be too late!

 Good Morning Memory Maze fans, Fiona here today on the blog. For this post I have created a page again using cuttables of everyone's favourite childhood story - Alice in Wonderland. The cuttables are such a versatile product good for cards, scrapbooks and journals. I used my Art by Marlene journal (A4 size), Dina Wakley scribble sticks, stencils and tissue paper and the cuttables and chipboard from Memory Maze!


Starting with the background I used three of the different blues of scribble stick, scribbling a good amount of pigment onto the paper (which is a heavy watercolour cardstock) and used my water brush to spread the colour around and blend the colour, as well as creating some patterns by using extra water over the background before it dried.

From there I used my trusty glue stick and glued onto the background four of the cuttable images that I had torn out from the page, overlapping them in a cluster before also colouring over the top of these randomly with the same three colours of scribble stick. From there I added the hearts tissue paper.


As I think of big red hearts when thinking of Alice in Wonderland I found a hearts stencil by Dina Wakley and used her ruby paint to paint through it to add bold bright red hearts. over most of the page, I had to reposition the stencil a couple of times to add hearts diagonally on the page to draw your eye to the chipboard words and the rabbit. I painted the rabbit black to stand out and left the letters raw as I like the look of raw chipboard on bright colours.


Have a great Thursday!


Items used:
Memory maze Cuttable sheet
Memory Maze chipboard
Dina Wakley paint - Ruby
Dina Wakley scribble sticks - Turquoise, peacock and sky
Dina Wakley tissue paper
Dina Wakley stencil - The best hearts
Art By Marlene A4 journal


Tuesday, November 17, 2020

Christmas Cards

 Good morning and welcome to my second blog post for November.

Today I am sharing two Christmas Cards that I have created using Memory Maze Christmas Chipboard pieces.

I have used my metallic rubs and white ink to colour the chipboard and with the use of white gauze I was able to add more dimension to the cards.


Memory Maze Chipboard pieces used....

Christmas Candle 
Holly and Hanging Baubles


Thank you for checking out the Christmas Cards I created for Memory Maze.

Jan Agnew
17th November 2010


Friday, November 13, 2020

Happy Birthday

 Hello and welcome to my blog post.

I have created female birthday cards using Memory Maze 3D Stack'ums designed my Sally McIntyre.

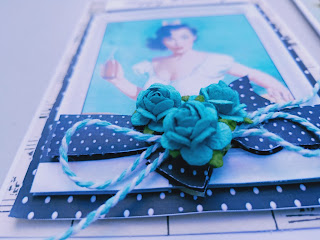
I cut each sheet into three layers popping them up with foam double sided tape.  I have added small flowers and string to match the colours in the stack'ums to add more layers to the cards.


Thank you for looking at my cards.

Jan Agnew

13 November 2020

Thursday, November 12, 2020

Merry Christmas

 Hi everyone.

Today I am sharing my share for the 12th November 2020

I have made a 6 x 6 inch card using a Christmas  cut apart from Memory Maze.


  • Cut a white piece of 12 x 12 inch card stock to measure 6 x 12 inches.
  • Fold in half so you have a 6 x6 inch card 
  • Cut a piece of blue cardstock to 5 3/4 x 5 3/4 inches and run through an embossing folder. Place foam tape to the back and tape to the card front
  • Cut a piece of silver card to 5 1/2 x 5 1/2 inches, distress around the edges and tape down flat onto the blue piece.
  • Cut up the cut apart and when you cut the large base piece cut away the outer edge, you will just have the frame. Tape this to the silver card.
  • Add the flowers, some are doubled and some are triple layers.
  • The white bow and red bow are double layer. Add a big bow over the top of the red bow. Add a bling piece to the centre. Make sure you add good strong glue.
  • Add some liquid drops to the berries and glitter in the centre of the poinsettia flowers.
  • Also add some diamond rhinestones around to add some bling to your card.


Memory Maze products used


Other products used

White, blue cardstock
Silver card, Embossing folder, edge destresser
foam and double sided tape, glue
Clear glitter, Liquid drops, Diamond Rhinestones

Thank you for visiting
Candy Chelepy
2020 Design Team


Tuesday, November 10, 2020

{Days gone by}

Hey there crafty friends!

It's Melissa A with you today and I have a new DT layout to share with you all featuring some absolutely stunning Memory Maze chipboard.

I love using some background chipboard in my layouts and on this one I have used some honeycomb. I find it fills in some gaps nicely while also adding some texture.


I have used the beautiful 'Lady' collection from Mintay on this layout and matched the chipboard to the theme of the collection. I thought the flourishes said 'elegant' so added them in and used some of Little Birdies wax in 'Glimmer Moss' & their sparkle paste in 'Silver Sage' over them.


On the honeycomb chipboard I used a combination of Oxide Inks in 'Squeezed Lemonade' & 'Worn Lipstick'


I added some beautiful flourish embellishment chipboards aswell and embossed them with some 'African Ancient Gold' embossing powder, which added some sparkle to the layout.


And for the title I used Little Birdies sparkle paste in 'Gold Glitz'.

I hope you liked this elegant lady like themed layout and it has inspired you to add some background chipboard and pretty flourishes to your future layouts.

That's all from me today, I'll be back again soon with some more inspiration. Until then...happy crafting! :)

Mel x

Products Used
-Mintay 'Lady' cardstock & cut out elements
-Green cardstock
-Yellow lace trimming
-Memory Maze 'Chicken Wire' chipboard
-Memory Maze 'Flourish' & 'Embellishments' chipboard
-Memory Maze 'Days gone by' title chipboard
-Kaisercraft 'Sage' paper blooms
-Little Birdie 'Melissa Buttermilk' flowers
-Green Tara 'Cornflowers Peach' flowers
-Ranger distress oxide inks in 'Squeezed Lemonade' & 'Worn Lipstick'
-Little Birdie sparkle paste in 'Gold Glitz' & 'Silver Sage'
-Stampendous Frantage Mica Fragments in 'Yellow'
-Walltleido embossing powder in 'African Ancient Gold'
-Little Birdie wax in 'Glimmer Moss'
-Dreamweaver metallic F/X in 'Pixie Blush'
-White Gesso
-Little Birdie mixed media stones


Monday, November 9, 2020

Good morning Memory Maze fans and welcome to the blog. Today I would like to share with you a boy layout, which I don't do very often as well as a layout with multiple photos again I do not do very often. This layout was entirely created with Memory Maze Chipboard except for the Melange Art Pebbles.

Keep Exploring


I started this layout by arranging my photos first and then picking a heap of chipboard cogs and started arranging them around my photos. To get the perfect design takes a while but once I am happy I am ready to paint the chipboard or in this case add some ink. But first I took a photo of my creation so I have a visual on how to put it all back together again.

I covered my Chipboard Cogs in Distress Oxide - Old Paper. I let that dry for 5 minutes and added everything back to my background including my photos. Once everything was adhered I added some Distress Oxide - Dusty Concord with my finger and rubbed it gently on my chipboard, after I added some water again with my finger which creates that oxidized effect, now it matches my background paper perfectly and has just added lots of dimension. I finished it by adding a tiny bit of wax - Mint Sparkle.

After I finished it I felt it needed a pop of white to bring everything to life so I added even more cogs but this time I covered them in white embossing powder, it really makes a difference I think.

  
I have used the following Chipboard elements:


- Cogs - lots of them :)

You will find these and heaps more chipboard righ here:

Thanks so much for stopping by!

Hugs

Hetty

Tuesday, November 3, 2020

Toxique - featuring new Cuttables

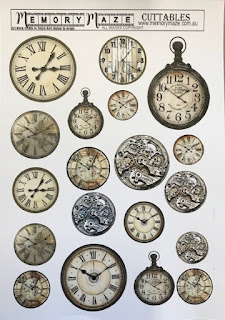
 Good afternoon, today on the blog I am sharing a journal page I created using the new Memory Maze Cuttables. These two pages below that I have used various pieces from are part of the steampunk range.


The card these are printed is a good thickness and easy to cut around. I am not a huge fan of the fussy cutting however did not mind these as they are mostly block shapes in which you can cut as little or as much detail as you like!

I started with a page from my A4 Art by Marlene journal which is a thick watercolour paper. I used distress oxides and inks to create the background, drying between layers building on the colours, trying to match them in with the printouts colours also. I started out with hickory smoke in distress oxide and black soot in the distress ink mini. I layers with more hickory smoke in regular distress ink and scattered straw before breaking out the clockwork stencil from Tim Holtz and using my absolute favourite colour - walnut stain, through that stencil to create more layers to the background.


I also used embellishments of the Tim Holtz 2020 curiosities sticker book along with the Memory Maze cuttables and a chipboard key that I coloured with spiced pumpkin distress ink. I used some text and a some words to add some further interest and called it done. You could easily turn something like this into a scrapbook page or a card with only the cuttables and some chipboard words!


The finished page...


Have a great week.

Fiona