Sunday, July 26, 2015

Mixed media project with Thander Aye


Hello. Welcome to my first post for this new term here at Memory Maze. I am very excited to start a creative journey with this team. Thank you very much for giving me a chance to share my creations here.  Today, I would like to share a pair of mixed media canvas boards created using some amazing Memory Maze chipboards. 

Mixed media canvas 

Here is a 5x7 mixed media canvas that I have created. Video tutorial found here

Video tutorial for this project


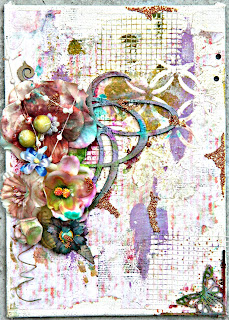
Here is the picture of the first canvas.

A little up close picture

A little detailed shot of the set here.

etc...

Memory Maze supplies used:

Project 2 title


Here is the second canvas 

A little detailed shot of the set here

Here is how the set look together.


etc...

Memory Maze supplies used:


Thanks for visiting


Memory Maze Design Team 2015

Friday, July 24, 2015

Best Buddies by Jodie Mason


Hello again and welcome to my first post for this new term here at Memory Maze. I hope this finds you all well. I have been busily creating and trying to prepare for my first scrapbooking retreat. To say that I am excited is a complete understatement! Today I have a layout for you showing a picture of my two boys from a few years ago, and a name tag that I have made for the retreat.

Best Buddies Layout

For this layout I found my Memory Maze 'Best Buddies' piece and searched through my photo collection for a picture that I thought would suit. I happened to find the perfect picture. My boys actually behaving, smiling and playing nice for the camera at the same time! I combined this with 2 tribal pieces (1 of which I have cut in 2) and some papers from Kaisercraft that worked well with both the boy theme and the colour scheme of the picture.

The 'Best Buddies' chippie was prepared by covering it with Adirondack alcohol ink (pitch black) and then rubbing some Adirondack Gold Mixative over the top with my finger. The black base shows through the thin patches of gold in places. To give this even more shine I have used 2 layers of Versa Mark (dazzle) and Zing clear embossing powder.

The Tribal pieces were also inked with the Adirondack Alcohol Ink (pitch black) only this time I added a single layer of Versa Mark (dazzle) and Ranger U.T.E.E. (in clear). Because only 1 coat of the U.T.E.E. was used it gave a very textured appearance to the piece.

In addition to the two previously mentioned chipboard pieces, I also used the remnant from a 'Family' piece. This was used like a stencil with an Emboss-it dabber and some Zing embossing powder in an opaque finish.

Best Buddies Layout

Close up of Best Buddies piece

Close up of the textured effect on the Tribal pieces.

Memory Maze supplies used:


Name Badge

I had to come up with some sort of a name badge for this retreat that I am headed to and I wanted it to be something that was a bit different, but that would also last for a while. So I thought why not make it out of chipboard? I cut a rectangle from a piece of plain board for the base piece. To this I added drops of Alcohol inks in a random pattern until they joined. I then used a flower stamp, some Versa Mark (dazzle) and Zing embossing powder (clear) to create some texture to the surface. Over the top of this I painted a coat of black gesso and then wiped some of it off with a baby wipe, and a layer of matt Gel Medium was applied over this to seal it. The Butterfly Corners and Frame were painted in foil glue and then when it was dry silver foil added to them. 
The base chipboard after having the alcohol ink dropped on it.

The completed name tag
Memory Maze supplies used:


Thanks for visiting

Memory Maze Design Team 2015

Wednesday, July 22, 2015

Tonka Fun (Finished)

Hi Everyone and welcome to my post for this week. 

I decided to play with toys this week. I have two boys so I found it really easy working with these papers and great chipboard this week. I love the Bobcat Chippy, it is so fun and it makes you feel like a kid again. 

Loving my Bobcat


I covered my chipboard pieces with Utee, which is a thick embossing powder. This is a really great embossing powder as it is nice and thick, meaning you normally only need to apply one or two layers and it will completely cover your chipboard pieces. I like it for using on large solid pieces of chipboard because it covers the piece nice and easy and gives a thick even finish.


This is my second layout for today. I thought I would do something a little more girly after spending so much time on a boy layout. 
I used this gorgeous owl which normally comes in a  twin pack But I have already used his mate. I spend some time painting him with lots of different coloured Twinkling H20"s. These are a solid pigment but turns to liquid when you add some water. I found using a water brush worked perfectly because the coloured pigment didn't become too wet. Just make sure you clean your brush between  each colour or you could end up with a bit of a mess.


The squares was sprayed with a spritz. This is such a quick and easy way of covering your chipboard and gives a nice even coverage, Just make sure it is dry before you pick it up.


Thanks for coming along today to have a look at  my work. Make sure you keep coming back each day to see all the other great work from the rest of the Design Team.

Mel
XXXX

Monday, July 20, 2015

Pet Beach layout and some cards - by Toni Herron

Hunter & Missy Beach LAYOUT

Hello Chippie fans. It's Toni here today to share with you some creations that I was lucky enough to complete during the school holidays. The first project features a fun and playful photo of my youngest son Hunter with our fur baby Missy at the beach. The new Aussie paper manufacturer Cocoa Vanilla and the Memory Maze chipboard worked perfectly for this layout.


The Brick chipboard piece was cut into three and all the individual bricks were popped out. Some have glitter added to the top and the individual bricks pieces have the edges painted to highlight them. 
The middle circle has Dristress Crackle paint to add texture. 


I had some scraps leftover, so also made this teen card.


Memory Maze supplies used:
Live A Colourful Life CARD

This is the first time I've attempted to create this style of card. However I must admit that I did destroy two others while in the process of making this one though. I love the black & white with splashes of colour. 

Here are some close up photos of the clusters. 
The Star pieces were all painted and some added glitter. The Feather pieces were coloured with Gelato. 
Gesso was coloured and used with the Corner Flourish stencil and Impasto was used with the Sunburst stencil in the middle.


Memory Maze supplies used:


Thanks for visiting
Toni Herron
Memory Maze Design Team 2015

Saturday, July 18, 2015

Kim Kendell's Design Team Share

Hi everyone and welcome to my Memory Maze blog post. 

Carefree

Hi All  today I am sharing 2 layouts with you. I have again left the chipboard raw so that it is a feature on my layout.


I have taken the frame and cut it in half to give the illusion of a larger piece 


I have used the following Memory Maze products:


2nd Layout

For my second LO I have used the Cog frame and cut the smaller inner ones off and added them to the center of the larger ones


I have used the following Memory Maze products


Thank you for coming to view my upload I hope I have inspired you to create something wonderful with Memory Maze.

Kim Kendell.
Memory Maze Design Team Member 2015


Thursday, July 16, 2015

Just Horsin' Around - Candy Chelepy

Hello everyone Candy here. This is my very first post as a Design Team member with Memory Maze I am very very excited to be with this lovely and friendly team of girls, and looking forward to many more wonderful exciting times ahead. 

Today I have created two layouts for you all, both using photos from my lovely cousin Gillian.

Project 1 - Gill

When I recieved my package from Memory Maze  I found I had this lovely double horse face chipboard piece and a bird with a branch set as well. I have used the Tim Holtz Alochol inks to colour them. By just daubing the colours in different areas until they where completely covered. I then covered the chipboard with Dimensional Magic and then waited patiently for them to all dry. 


Some close ups for you all
The double horse head chipboard piece


 And the branch and lovely little bird


Memory Maze Supply List


Project 2 - Beach Fun

I wanted to create this layout using the left over pieces from the previous page. 
With this one I used one of  the  pieces from the oval set of chipboard pieces and a very large swirl . I once again I coloured the chipboard using Tim Holtz Alcohol Inks then the Dimensional Magic over the top then I decided to sprinkle some silver microbeads over the top to give it some bling.


Close ups


Memory Maze Supply List


Matt Board Oval Set of 7


Brick after brick small bricks  poly template  8x8 sold in 3\'s


Thank you for coming along and visiting my creations for Memory Maze


Candy 
Memory Maze Design Team 2015